
 1[
 2    {
 3        "id": "1",
 4        "name" : "foo",
 5        "genres": "pop",
 6        "albums" : [
 7            {
 8                "title" : "album_one",
 9                "artist" : "foo",
10                "ntracks" : 12
11            },
12            {
13                "title" : "album_two",
14                "artist" : "foo",
15                "ntracks" : 15
16            }
17        ]
18    },
19    {
20        "id" : "2",
21        "name" : "bar",
22        "genres": "rock",
23        "albums" : [
24            {
25                "title" : "album_rock",
26                "artist" : "bar",
27                "ntracks" : 15
28            }
29        ]
30    },
31    {
32        "id": "3",
33        "name" : "dj",
34        "genres": "hip hop",
35        "albums" : [
36            {
37                "title" : "album_dj",
38                "artist" : "dj",
39                "ntracks" : 7
40            }
41        ]
42    },
43    {
44        "id": "4",
45        "name" : "flow",
46        "genres": "R&B",
47        "albums" : [
48            {
49                "title" : "album_long",
50                "artist" : "flow",
51                "ntracks" : 22
52            }
53        ]
54    },
55    {
56        "id": "5",
57        "name" : "cc",
58        "genres": "country",
59        "albums" : [
60            {
61                "title" : "album_short",
62                "artist" : "cc",
63                "ntracks" : 5
64            }
65        ]
66    },
67    {
68        "id": "6",
69        "name" : "axis",
70        "genres": "classical",
71        "albums" : [
72            {
73                "title" : "album_one",
74                "artist" : "axis",
75                "ntracks" : 9
76            },
77            {
78                "title" : "album_two",
79                "artist" : "axis",
80                "ntracks" : 8
81            },
82            {
83                "title" : "album_three",
84                "artist" : "axis",
85                "ntracks" : 11
86            }
87        ]
88    }
89]Consuming a RESTful web service with ReactJS
Prerequisites:
Table of contents
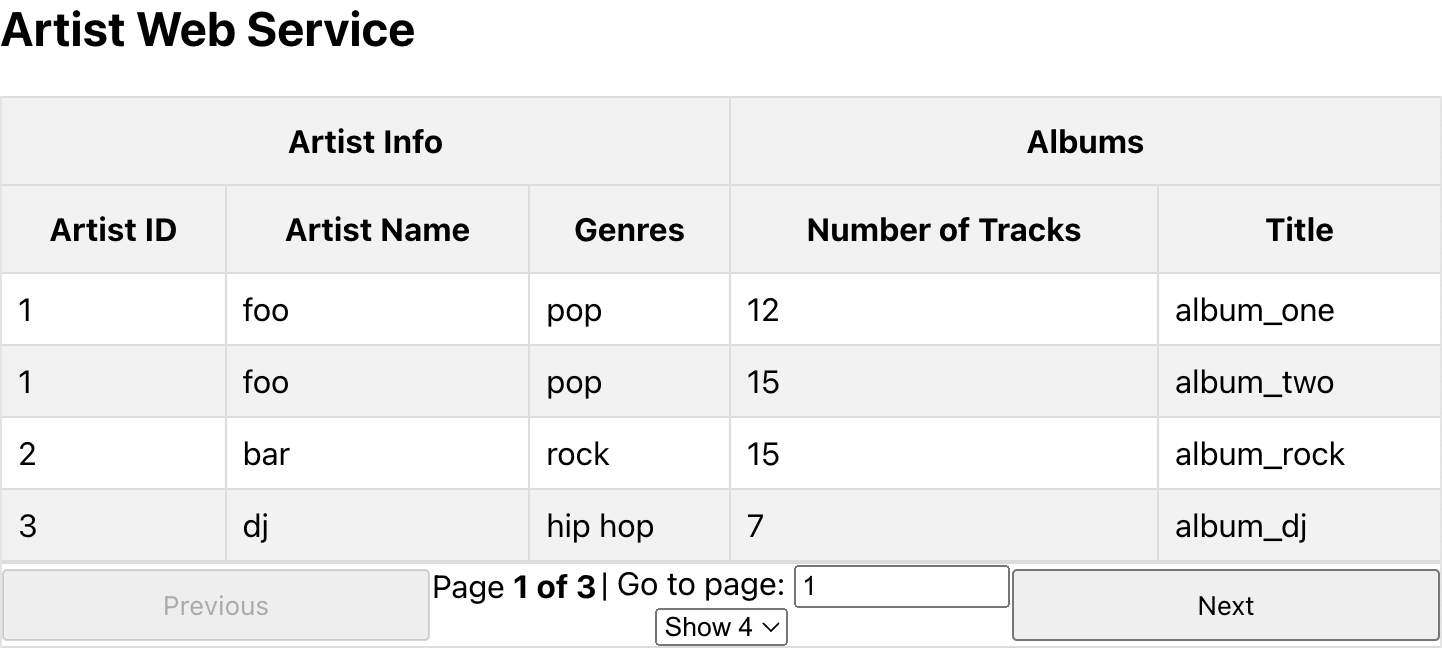
Explore how to access a simple RESTful web service and consume its resources with ReactJS in Open Liberty.
What you’ll learn
You will learn how to access a REST service and deserialize the returned JSON that contains a list of artists and their albums by using an HTTP client with the ReactJS library. You will then present this data by using a ReactJS paginated table component.
ReactJS is a JavaScript library that is used to build user interfaces. Its main purpose is to incorporate a component-based approach to create reusable UI elements. With ReactJS, you can also interface with other libraries and frameworks. Note that the names ReactJS and React are used interchangeably.
The React application in this guide is provided and configured for you in the src/main/frontend directory. The application uses Next.js, a React-powered framework, to set up the modern React application. The Next.js framework provides a powerful environment for learning and building React applications, with features like server-side rendering, static site generation, and easy API routes. It is the best way to start building a highly performant React application.
artists.json
The REST service that provides the resources was written for you in advance in the back end of the application, and it responds with the artists.json file in the src/resources directory. You will implement a ReactJS client as the front end of your application, which consumes this JSON file and displays its contents on a single web page.
To learn more about REST services and how you can write them, see the Creating a RESTful web service guide.
Getting started
The fastest way to work through this guide is to clone the Git repository and use the projects that are provided inside:
git clone https://github.com/openliberty/guide-rest-client-reactjs.git
cd guide-rest-client-reactjs
The start directory contains the starting project that you will build upon.
The finish directory contains the finished project that you will build.
Before you begin, make sure you have all the necessary prerequisites.
Try what you’ll build
The finish directory in the root of this guide contains the finished application. The React front end is already pre-built for you and the static files from the production build can be found in the src/main/webapp/_next/static directory.
To try out the application, navigate to the finish directory and run the following Maven goal to build the application and deploy it to Open Liberty:
WINDOWS
MAC
LINUX
cd finish
mvnw.cmd process-resources
mvnw.cmd liberty:run
cd finish
./mvnw process-resources
./mvnw liberty:runcd finish
./mvnw process-resources
./mvnw liberty:runAfter you see the following message, your application Liberty instance is ready:
The defaultServer server is ready to run a smarter planet.
Next, point your browser to the http://localhost:9080 web application root to see the following output:
After you are finished checking out the application, stop the Liberty instance by pressing CTRL+C in the command-line session where you ran Liberty. Alternatively, you can run the liberty:stop goal from the finish directory in another shell session:
WINDOWS
MAC
LINUX
mvnw.cmd liberty:stop./mvnw liberty:stop./mvnw liberty:stopStarting the service
Before you begin the implementation, start the provided REST service so that the artist JSON is available to you.
Navigate to the start directory to begin.
When you run Open Liberty in dev mode, dev mode listens for file changes and automatically recompiles and deploys your updates whenever you save a new change. Run the following goal to start Open Liberty in dev mode:
WINDOWS
MAC
LINUX
mvnw.cmd liberty:dev./mvnw liberty:dev./mvnw liberty:devAfter you see the following message, your Liberty instance is ready in dev mode:
**************************************************************
*    Liberty is running in dev mode.
Dev mode holds your command-line session to listen for file changes. Open another command-line session to continue, or open the project in your editor.
After you start the service, you can find your artist JSON at the http://localhost:9080/artists URL.
All the dependencies for the React front end are listed in the src/main/frontend/src/package.json file and are installed before the build process by the frontend-maven-plugin. Also, CSS stylesheets files are available in the src/main/frontend/src/styles directory.
Project configuration
The front end of your application uses Node.js to build your React code. The Maven project is configured for you to install Node.js and produce the production files, which are copied to the web content of your application.
Node.js is a server-side JavaScript runtime that is used for developing networking applications. Its convenient package manager, npm, is used to run the React build scripts that are found in the package.json file. To learn more about Node.js, see the official Node.js documentation.
The frontend-maven-plugin is used to install the dependencies that are listed in your package.json file from the npm registry into a folder called node_modules. The node_modules folder can be found in your working directory. Then, the configuration produces the production files to the src/main/frontend/build directory.
The maven-resources-plugin copies the static content from the build directory to the web content of the application.
pom.xml
Creating the default page
Create the entry point of your React application. The latest version of Next.js recommends you use the App Router, which centralizes routing logic under the app directory.
To construct the home page of the web application, create a page.jsx file.
Create thepage.jsxfile.src/main/frontend/src/app/page.jsx
page.jsx
1import "../../styles/index.css";
2import ArtistTable from "./ArtistTable";
3import React from 'react';
4
5// tag::createHome[]
6export default function Home() {
7 return (
8 // tag::displayArtistTable[]
9 <ArtistTable></ArtistTable>
10 // end::displayArtistTable[]
11 );
12}
13// end::createHome[]The page.jsx file is a container for all other components. When the Home React component is rendered, the ArtistTable components content are displayed.
To render the pages correctly, add a layout.jsx file that defines the RootLayout containing the UI that are shared across all routes.
Create thelayout.jsxfile.src/main/frontend/src/app/layout.jsx
layout.jsx
1export const metadata = {
2 title: 'Next.js',
3 description: 'Generated by Next.js',
4}
5
6export default function RootLayout({ children }) {
7 return (
8 <html lang="en">
9 <body>{children}</body>
10 </html>
11 )
12}For more detailed information, see the Next.js documentation on the Layouts and Pages.
Creating the React component
A React web application is a collection of components, and each component has a specific function. You will create a component that the application uses to acquire and display data from the REST API.
Create the ArtistTable function that fetches data from your back-end and renders it in a table.
Create theArtistTable.jsxfile.src/main/frontend/src/app/ArtistTable.jsx
ArtistTable.jsx
At the beginning of the file, the use client directive indicates the ArtistTable component is rendered on the client side.
The React library imports the react package for you to create the ArtistTable function. This function must have the export declaration because it is being exported to the page.jsx module. The posts object is initialized using a React Hook that lets you add a state to represent the state of the posts that appear on the paginated table.
To display the returned data, you will use pagination. Pagination is the process of separating content into discrete pages, and you can use it for handling data sets in React. In your application, you’ll render the columns in the paginated table. The columns constant defines the table that is present on the web page.
The useReactTable hook creates a table instance. The hook takes in the columns and posts as parameters. The getCoreRowModel function is included for the generation of the core row model of the table, which serves as the foundational row model upon pagination and sorting build. The getPaginationRowModel function applies pagination to the core row model, returning a row model that includes only the rows that should be displayed on the current page based on the pagination state. In addition, the getSortedRowModel function sorts the paginated table by the column headers then applies the changes to the row model. The paginated table instance is assigned to the table constant, which renders the paginated table on the web page.
Importing the HTTP client
Your application needs a way to communicate with and retrieve resources from RESTful web services to output the resources onto the paginated table. The Axios library will provide you with an HTTP client. This client is used to make HTTP requests to external resources. Axios is a promise-based HTTP client that can send asynchronous requests to REST endpoints. To learn more about the Axios library and its HTTP client, see the Axios documentation.
The GetArtistsInfo() function uses the Axios API to fetch data from your back end. This function is called when the ArtistTable is rendered to the page using the useEffect() React lifecycle method.
Update theArtistTable.jsxfile.src/main/frontend/src/app/ArtistTable.jsx
ArtistTable.jsx
1// tag::render-client[]
2"use client";
3// end::render-client[]
4// tag::react-library[]
5import React, { useEffect, useMemo, useState } from 'react';
6// end::react-library[]
7// tag::axios-library[]
8import axios from 'axios';
9// end::axios-library[]
10// tag::react-table[]
11import { useReactTable, getCoreRowModel, getPaginationRowModel, getSortedRowModel, flexRender} from '@tanstack/react-table';
12// end::react-table[]
13// tag::custom-style[]
14import '../../styles/table.css'
15// end::custom-styly[]
16
17// tag::ArtistTable[]
18function ArtistTable() {
19 // end::ArtistTable[]
20
21 // tag::posts[]
22 const [posts, setPosts] = useState([]);
23 // end::posts[]
24 // tag::sorting[]
25 const [sorting, setSorting] = useState([]);
26 // end::sorting[]
27 // tag::pagination[]
28 const [pagination, setPagination] = useState({pageIndex: 0, pageSize: 4});
29 // end::pagination[]
30
31 // tag::get-posts[]
32 const GetArtistsInfo = async () => {
33 try {
34 // tag::axios[]
35 const response = await axios.get('http://localhost:9080/artists');
36 // end::axios[]
37 // tag::response-data[]
38 const artists = response.data;
39 // end::response-data[]
40 const processedData = [];
41 // tag::for-artists[]
42 for (const artist of artists) {
43 // tag::spread-one[]
44 const { albums, ...rest } = artist;
45 // end::spread-one[]
46 for (const album of albums) {
47 // tag::spread-two[]
48 processedData.push({ ...rest, ...album });
49 // end::spread-two[]
50 }
51 };
52 //tag::setState[]
53 setPosts(processedData);
54 // end::setState[]
55 } catch (error) {
56 console.log(error);
57 }
58 };
59 // end::get-posts[]
60
61 // tag::useMemo[]
62 const data = useMemo(() => [...posts], [posts]);
63 // end::useMemo[]
64
65 // tag::table-info[]
66 const columns = useMemo(() => [{
67 header: 'Artist Info',
68 columns: [
69 {
70 accessorKey: 'id',
71 header: 'Artist ID'
72 },
73 {
74 accessorKey: 'name',
75 header: 'Artist Name'
76 },
77 {
78 accessorKey: 'genres',
79 header: 'Genres'
80 }
81 ]
82 },
83 {
84 header: 'Albums',
85 columns: [
86 {
87 accessorKey: 'ntracks',
88 header: 'Number of Tracks'
89 },
90 {
91 accessorKey: 'title',
92 header: 'Title'
93 }
94 ]
95 }
96 ], []
97 );
98 // end::table-info[]
99
100 // tag::useReactTable[]
101 const tableInstance = useReactTable({
102 columns,
103 data,
104 // tag::getCoreRowModel[]
105 getCoreRowModel: getCoreRowModel(),
106 // end::getCoreRowModel[]
107 // tag::getPaginationRowModel[]
108 getPaginationRowModel: getPaginationRowModel(),
109 // end::getPaginationRowModel[]
110 // tag::getSortedRowModel[]
111 getSortedRowModel: getSortedRowModel(),
112 // end::getSortedRowModel[]
113 state:{
114 sorting: sorting,
115 pagination: pagination,
116 },
117 onSortingChange: setSorting,
118 onPaginationChange: setPagination,
119 });
120 // end::useReactTable[]
121
122 // tag::destructuring[]
123 const {
124 getHeaderGroups,
125 getRowModel,
126 getState,
127 setPageIndex,
128 setPageSize,
129 getCanPreviousPage,
130 getCanNextPage,
131 previousPage,
132 nextPage,
133 getPageCount,
134 } = tableInstance;
135 // end::destructuring[]
136
137 const {pageIndex, pageSize} = getState().pagination;
138
139 // tag::useEffect[]
140 useEffect(() => {
141 GetArtistsInfo();
142 }, []);
143 // end::useEffect[]
144
145 // tag::return-table[]
146 return (
147 <>
148 <h2>Artist Web Service</h2>
149 {/* tag::table[] */}
150 <table>
151 <thead>
152 {getHeaderGroups().map(headerGroup => (
153 <tr key={headerGroup.id}>
154 {headerGroup.headers.map(header => (
155 <th key={header.id} colSpan={header.colSpan} onClick={header.column.getToggleSortingHandler()}>
156 {header.isPlaceholder ? null :(
157 <div>
158 {flexRender(header.column.columnDef.header, header.getContext())}
159 {
160 {
161 asc: " 🔼",
162 desc: " 🔽",
163 }[header.column.getIsSorted() ?? null]
164 }
165 </div>
166 )}
167 </th>
168 ))}
169 </tr>
170 ))}
171 </thead>
172 <tbody>
173 {getRowModel().rows.map(row => (
174 <tr key={row.id}>
175 {row.getVisibleCells().map(cell => (
176 <td key={cell.id}>
177 {flexRender(cell.column.columnDef.cell, cell.getContext())}
178 </td>
179 ))}
180 </tr>
181 ))}
182 </tbody>
183 </table>
184 {/* end::table[] */}
185 <div className="pagination">
186 <button onClick={() => previousPage()} disabled={!getCanPreviousPage()}>
187 {'Previous'}
188 </button>{' '}
189 <div className="page-info">
190 <span>
191 Page{' '}
192 <strong>
193 {pageIndex + 1} of {getPageCount()}
194 </strong>{' '}
195 </span>
196 <span>
197 | Go to page:{' '}
198 <input
199 type="number"
200 defaultValue={pageIndex + 1}
201 onChange={e => {
202 const page = e.target.value ? Number(e.target.value) - 1 : 0
203 setPageIndex(page);
204 }}
205 style={{ width: '100px' }}
206 />
207 </span>{' '}
208 <select
209 value={pageSize}
210 onChange={e => {
211 setPageSize(Number(e.target.value))
212 }}
213 >
214 {[4, 5, 6, 9].map(pageSize => (
215 <option key={pageSize} value={pageSize}>
216 Show {pageSize}
217 </option>
218 ))}
219 </select>
220 </div>
221 <button onClick={() => nextPage()} disabled={!getCanNextPage()}>
222 {'Next'}
223 </button>{' '}
224 </div>
225 </>
226 );
227 // end::return-table[]
228}
229
230export default ArtistTableAdd the axios library and the GetArtistsInfo() function.
The axios HTTP call is used to read the artist JSON that contains the data from the sample JSON file in the resources directory. When a response is successful, the state of the system changes by assigning response.data to posts. The artists and their albums JSON data are manipulated to allow them to be accessed by the ReactTable. The …rest or …album object spread syntax is designed for simplicity. To learn more about it, see Spread in object literals.
Building and packaging the front-end
After you successfully build your components, you need to build the front end and package your application. The Maven process-resources goal generates the Node.js resources, creates the front-end production build, and copies and processes the resources into the destination directory.
In a new command-line session, build the front end by running the following command in the start directory:
WINDOWS
MAC
LINUX
mvnw.cmd process-resources./mvnw process-resources./mvnw process-resourcesThe build may take a few minutes to complete. You can rebuild the front end at any time with the Maven process-resources goal. Any local changes to your JavaScript and HTML are picked up when you build the front-end.
Navigate to the http://localhost:9080 web application root to view the front end of your application.
Testing the React client
Next.js supports various testing tools. This guide uses Vitest for unit testing the React components, with the test file App.test.jsx located in src/main/frontend/tests/ directory. The App.test.jsx file is a simple JavaScript file that tests against the page.jsx component. No explicit test cases are written for this application. To learn more about Vitest, see Setting up Vitest with Next.js.
App.test.jsx
1import { describe, it, expect, test } from 'vitest'
2import { render, screen } from '@testing-library/react'
3import '@testing-library/jest-dom/vitest';
4import Home from '../src/app/page'
5import React from 'react';
6
7
8/**
9* @vitest-environment jsdom
10*/
11describe('Testing home page rendering', async () => {
12 it('Should render the page correctly', async () => {
13 // Setup
14 render(<Home />)
15 expect(screen.getByText(/Artist Web Service/i)).toBeInTheDocument();
16 });
17});Update thepom.xmlfile.pom.xml
pom.xml
  1<?xml version='1.0' encoding='utf-8'?>
  2<project xmlns="http://maven.apache.org/POM/4.0.0" xmlns:xsi="http://www.w3.org/2001/XMLSchema-instance" xsi:schemaLocation="http://maven.apache.org/POM/4.0.0 http://maven.apache.org/xsd/maven-4.0.0.xsd">
  3
  4    <modelVersion>4.0.0</modelVersion>
  5
  6    <groupId>com.microprofile.demo</groupId>
  7    <artifactId>guide-rest-client-reactjs</artifactId>
  8    <version>1.0-SNAPSHOT</version>
  9    <packaging>war</packaging>
 10
 11    <properties>
 12        <project.build.sourceEncoding>UTF-8</project.build.sourceEncoding>
 13        <project.reporting.outputEncoding>UTF-8</project.reporting.outputEncoding>
 14        <maven.compiler.source>11</maven.compiler.source>
 15        <maven.compiler.target>11</maven.compiler.target>
 16        <!-- Liberty configuration -->
 17        <liberty.var.http.port>9080</liberty.var.http.port>
 18        <liberty.var.https.port>9443</liberty.var.https.port>
 19    </properties>
 20
 21    <dependencies>
 22        <!-- Provided dependencies -->
 23        <dependency>
 24            <groupId>jakarta.platform</groupId>
 25            <artifactId>jakarta.jakartaee-api</artifactId>
 26            <version>10.0.0</version>
 27            <scope>provided</scope>
 28        </dependency>
 29        <dependency>
 30            <groupId>org.eclipse.microprofile</groupId>
 31            <artifactId>microprofile</artifactId>
 32            <version>7.1</version>
 33            <type>pom</type>
 34            <scope>provided</scope>
 35        </dependency>
 36
 37        <!-- For tests -->
 38        <dependency>
 39            <groupId>org.junit.jupiter</groupId>
 40            <artifactId>junit-jupiter</artifactId>
 41            <version>5.14.0</version>
 42            <scope>test</scope>
 43        </dependency>
 44    </dependencies>
 45
 46    <build>
 47        <finalName>${project.artifactId}</finalName>
 48        <plugins>
 49            <plugin>
 50                <groupId>org.apache.maven.plugins</groupId>
 51                <artifactId>maven-war-plugin</artifactId>
 52                <version>3.5.0</version>
 53            </plugin>
 54            <!-- Enable liberty-maven plugin -->
 55            <plugin>
 56                <groupId>io.openliberty.tools</groupId>
 57                <artifactId>liberty-maven-plugin</artifactId>
 58                <version>3.11.5</version>
 59            </plugin>
 60            <!-- Frontend resources -->
 61            <!-- tag::frontend-plugin[] -->
 62            <plugin>
 63                <groupId>com.github.eirslett</groupId>
 64                <artifactId>frontend-maven-plugin</artifactId>
 65                <version>1.15.4</version>
 66                <configuration>
 67                    <!-- tag::working-dir[] -->
 68                    <workingDirectory>src/main/frontend</workingDirectory>
 69                    <!-- end::working-dir[] -->
 70                </configuration>
 71                <executions>
 72                    <execution>
 73                        <id>install node and npm</id>
 74                        <goals>
 75                            <goal>install-node-and-npm</goal>
 76                        </goals>
 77                        <configuration>
 78                            <nodeVersion>v20.14.0</nodeVersion>
 79                            <npmVersion>10.7.0</npmVersion>
 80                        </configuration>
 81                    </execution>
 82                    <!-- tag::node-resource-install[] -->
 83                    <execution>
 84                        <id>npm install</id>
 85                        <goals>
 86                            <goal>npm</goal>
 87                        </goals>
 88                        <configuration>
 89                            <arguments>install</arguments>
 90                        </configuration>
 91                    </execution>
 92                    <!-- end::node-resource-install[] -->
 93                    <!-- tag::node-resource-build[] -->
 94                    <execution>
 95                        <id>npm run build</id>
 96                        <goals>
 97                            <goal>npm</goal>
 98                        </goals>
 99                        <configuration>
100                            <arguments>run build</arguments>
101                        </configuration>
102                    </execution>
103                    <!-- end::node-resource-build[] -->
104                    <!-- tag::node-tests[] -->
105                    <execution>
106                        <id>run tests</id>
107                        <goals>
108                            <goal>npm</goal>
109                        </goals>
110                        <configuration>
111                            <arguments>test a</arguments>
112                            <environmentVariables>
113                                <CI>true</CI>
114                            </environmentVariables>
115                        </configuration>
116                    </execution>
117                    <!-- end::node-tests[] -->
118                </executions>
119            </plugin>
120            <!-- end::frontend-plugin[] -->
121            <!-- Copy frontend static files to target directory -->
122            <!-- tag::copy-plugin[] -->
123            <plugin>
124                <groupId>org.apache.maven.plugins</groupId>
125                <artifactId>maven-resources-plugin</artifactId>
126                <version>3.3.1</version>
127                <executions>
128                    <execution>
129                        <id>Copy frontend build to target</id>
130                        <phase>process-resources</phase>
131                        <goals>
132                            <goal>copy-resources</goal>
133                        </goals>
134                        <configuration>
135                            <outputDirectory>
136                                <!-- tag::output-directory[] -->
137                                ${basedir}/src/main/webapp
138                                <!-- end::output-directory[] -->
139                            </outputDirectory>
140                            <resources>
141                                <resource>
142                                    <directory>
143                                        <!-- tag::directory[] -->
144                                        ${basedir}/src/main/frontend/out
145                                        <!-- end::directory[] -->
146                                    </directory>
147                                    <filtering>true</filtering>
148                                </resource>
149                            </resources>
150                        </configuration>
151                    </execution>
152                </executions>
153            </plugin>
154            <!-- end::copy-plugin[] -->
155        </plugins>
156    </build>
157
158</project>To run the default test, you can add the testing configuration to the frontend-maven-plugin. Rerun the Maven process-resources goal to rebuild the front end and run the tests.
WINDOWS
MAC
LINUX
mvnw.cmd process-resources./mvnw process-resources./mvnw process-resourcesIf the test passes, you see a similar output to the following example:
[INFO]  ✓ __tests__/App.test.jsx  (1 test) 96ms
[INFO]
[INFO]  Test Files  1 passed (1)
[INFO]       Tests  1 passed (1)
[INFO]    Start at  10:43:25
[INFO]    Duration  3.73s (transform 264ms, setup 0ms, collect 343ms, tests 96ms, environment 408ms, prepare 1.16s)
Although the React application in this guide is simple, when you build more complex React applications, testing becomes a crucial part of your development lifecycle. If you need to write application-oriented test cases, follow the official React testing documentation.
When you are done checking the application root, exit dev mode by pressing CTRL+C in the shell session where you ran the Liberty.
Great work! You’re done!
Nice work! You just accessed a simple RESTful web service and consumed its resources by using ReactJS in Open Liberty.
Guide Attribution
Consuming a RESTful web service with ReactJS by Open Liberty is licensed under CC BY-ND 4.0

Copied to clipboard
Prerequisites:
Great work! You're done!
What did you think of this guide?


Thank you for your feedback!
What could make this guide better?
Raise an issue to share feedback
Create a pull request to contribute to this guide
Need help?
Ask a question on Stack Overflow


