
Contents
- What you’ll learn
- Additional prerequisites
- Getting started
- Creating the consumer in the inventory microservice
- Creating the message producer in the system service
- Running the application
- Testing the inventory application
- Optional: Using IBM MQ as the messaging server
- Great work! You’re done!
- Guide Attribution
Tags
Producing and consuming messages in Java microservices
Prerequisites:
Table of contents
Learn how to produce and consume messages to communicate between Java microservices in a standard way by using the Jakarta Messaging API with the embedded Liberty Messaging Server or an external messaging server, IBM MQ.
What you’ll learn
You’ll learn how to communicate between Java web services when one service is producing a continuous stream of asynchronous messages or events to be consumed by other services, rather than just sending and receiving individual requests for data. You will also learn how to use a messaging server and client to manage the production and consumption of the messages by the services.
In this guide, you will first use the embedded Liberty Messaging Server to manage messages, then you will optionally switch to using an external messaging server to manage the messages, in this case, IBM MQ. You might use an external messaging server if it is critical that none of the messages is lost if there is a system overload or outage; for example during a bank transfer in a banking application.
You will learn how to write your Java application using the Jakarta Messaging API which provides a standard way to produce and consume messages in Java application, regardless of which messaging server your application will ultimately use.
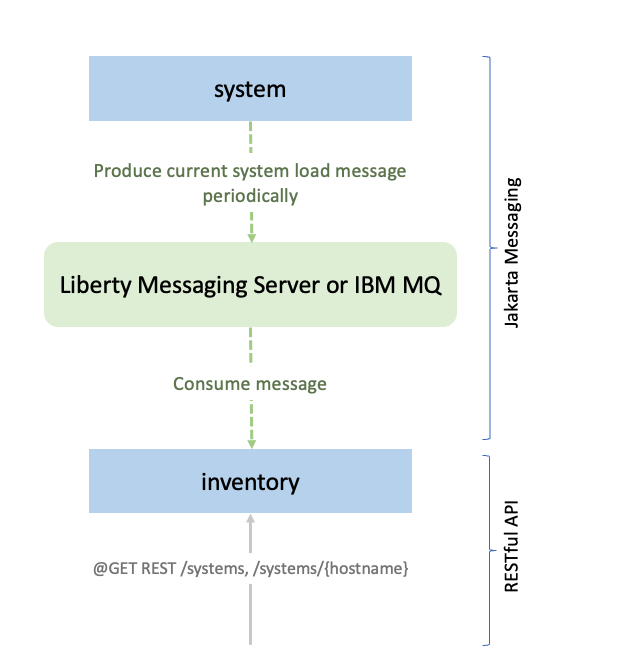
The application in this guide consists of two microservices, system and inventory. Every 15 seconds, the system microservice computes and publishes a message that contains the system’s current CPU and memory load usage. The inventory microservice subscribes to that information at the /systems REST endpoint so that it can keep an updated list of all the systems and their current system loads.
You’ll create the system and inventory microservices using the Jakarta Messaging API to produce and consume the messages using the embedded Liberty Messaging Server.
You will then, optionally, reconfigure the application, without changing the application’s Java code, to use an external IBM MQ messaging server instead.
Additional prerequisites
To complete the optional Using IBM MQ as the messaging server section in this guide, install Docker if it is not already installed. You will use an IBM MQ container as the external messaging server. For installation instructions, refer to the official Docker documentation.
Make sure to start your Docker daemon before you proceed.
Getting started
The fastest way to work through this guide is to clone the Git repository and use the projects that are provided inside:
git clone https://github.com/openliberty/guide-jms-intro.git
cd guide-jms-intro
The start directory contains the starting project that you will build upon.
The finish directory contains the finished project that you will build.
Before you begin, make sure you have all the necessary prerequisites.
Try what you’ll build
The finish directory in the root of this guide contains the finished application. Give it a try before you proceed.
To try out the application, first go to the finish directory and run the following Maven goal to build and install the models module. The models module contains the SystemLoad data class for both the system and inventory microservices to use.
WINDOWS
MAC
LINUX
cd finish
mvnw.cmd -pl models clean install
cd finish
./mvnw -pl models clean installStart the inventory microservice by running the following command:
WINDOWS
MAC
LINUX
mvnw.cmd -pl inventory liberty:run./mvnw -pl inventory liberty:run./mvnw -pl inventory liberty:runNext, open another command-line session, navigate to the finish directory, and start the system microservice by using the following command:
WINDOWS
MAC
LINUX
mvnw.cmd -pl system liberty:dev./mvnw -pl system liberty:runWhen you see the following message, your Liberty instances are ready:
The defaultServer server is ready to run a smarter planet.
Visit the http://localhost:9081/health URL to confirm that the inventory microservice is up and running.
When both the liveness and readiness health checks are up, go to the http://localhost:9081/inventory/systems URL to access the inventory microservice. You see the systemLoad property for all the systems:
{
   "hostname": <your hostname>,
   "systemLoad": 6.037155240703536E-9
}
You can revisit the http://localhost:9081/inventory/systems URL after a while, and you will notice the systemLoad property for the systems changed.
You can also use curl command to retrieve the hostname and systemLoad information from the /inventory/systems REST endpoint in another command line session:
curl http://localhost:9081/inventory/systems
After you are finished checking out the application, stop the Liberty instances by pressing CTRL+C in each command-line session where you ran Liberty. Alternatively, you can run the liberty:stop goal from the finish directory in another shell session:
WINDOWS
MAC
LINUX
mvnw.cmd -pl inventory liberty:stop
mvnw.cmd -pl system liberty:stop
./mvnw -pl inventory liberty:stop
./mvnw -pl system liberty:stopCreating the consumer in the inventory microservice
Navigate to the start directory to begin.
When you run Open Liberty in dev mode, dev mode listens for file changes and automatically recompiles and deploys your updates whenever you save a new change.
Run the following goal to start the inventory microservice in dev mode:
WINDOWS
MAC
LINUX
mvnw.cmd -pl inventory liberty:dev./mvnw -pl inventory liberty:dev./mvnw -pl inventory liberty:devWhen you see the following message, your Liberty instance is ready in dev mode:
**************************************************************
*    Liberty is running in dev mode.
Dev mode holds your command-line session to listen for file changes. Open another command-line session to continue, or open the project in your editor.
The inventory microservice records in its inventory the recent system load information that it received from potentially multiple instances of the system microservice.
Create theInventoryQueueListenerclass.inventory/src/main/java/io/openliberty/guides/inventory/InventoryQueueListener.java
InventoryQueueListener.java
The inventory microservice receives the messages from the system microservice. Implement the InventoryQueueListener class with the MessageListener interface and annotate with to monitor the jms/InventoryQueue message queue. Implement the onMessage() method that processes the incoming messages, updates the inventory by using the InventoryManager bean, and logs the action. Use the SystemLoad.fromJson() method to convert the JSON message string to the SystemLoad object.
Next, configure the inventory microservice with an embedded messaging server and the Messaging Server Client feature.
Replace the inventory'sserver.xmlconfiguration file.inventory/src/main/liberty/config/server.xml
inventory/server.xml
The messagingServer feature enables a Liberty runtime to host an embedded messaging server to manage messaging destinations. The messagingClient feature enables applications to connect to a Liberty messaging server and access the messaging destinations hosted on that server through the Jakarta Messaging API that is enabled by the messaging feature.
Add the wasJmsEndpoint element to configure the Liberty runtime to monitor and manage incoming JMS connections from any hosts. Set up the messagingEngine configuration to ensure that the Liberty runtime can manage incoming message queues more effectively, assigning a reliable and persistent destination for the InventoryQueue. Configure a jmsConnectionFactory element to use the InventoryCM connection manager and set properties for the JMS implementation. Define a jmsQueue element for the InventoryQueue message queue with its JNDI name and a jmsActivationSpec element to configure properties, including the queue listener class name and maximum concurrency.
To learn more about configuration for the jmsQueue element and jmsConnectionFactory element, see the JMS Queue and JMS Connection Factory documentation.
Creating the message producer in the system service
Open another command-line session, navigate to the start directory, and run the following goal to start the system microservice in dev mode:
WINDOWS
MAC
LINUX
mvnw.cmd -pl system liberty:dev./mvnw -pl system liberty:dev./mvnw -pl system liberty:devWhen you see the following message, your Liberty instance is ready in dev mode:
**************************************************************
*    Liberty is running in dev mode.
The system microservice is the producer of the messages that are published to the messaging server as a stream of events. Every 15 seconds, the system microservice triggers an event that calculates the recent CPU usage for the last minute.
Create theSystemServiceclass.system/src/main/java/io/openliberty/guides/system/SystemService.java
SystemService.java
The SystemService class contains the sendSystemLoad() method that calculates the recent system load, creates a SystemLoad object, and publishes the object as a message to the jms/InventoryQueue message queue running in the messaging server by using the send() method. The @Schedule annotation on the sendSystemLoad() method sets the frequency at which the system service publishes the calculation to the event stream, ensuring it runs every 15 seconds.
Next, configure the system microservice to access the message queue.
Replace the system'sserver.xmlconfiguration file.system/src/main/liberty/config/server.xml
system/server.xml
The messaging and messagingClient features enable the Liberty runtime to provide the required messaging services. Add a connectionManager element to handle connections for the messaging server running on the inventory microservice. Define the jmsConnectionFactory element to use the InventoryCM connection manager and set up the required remoteServerAddress properties. Use the jmsQueue element to define the inventory message queue.
In your dev mode console for the system microservice, type r and press enter/return key to restart the Liberty instance so that Liberty reads the configuration changes. When you see the following message, your Liberty instance is ready in dev mode:
**************************************************************
*    Liberty is running in dev mode.
Running the application
You started the Open Liberty in dev mode at the beginning of the guide, so all the changes were automatically picked up.
You can find the inventory microservice at the following URLs:
You can also use curl command to retrieve the hostname and systemLoad information from the /inventory/systems REST endpoint in another command line session:
curl http://localhost:9081/inventory/systems
Testing the inventory application
While you can test your application manually, you should rely on automated tests because they trigger a failure whenever a code change introduces a defect. Because the application is a RESTful web service application, you can use JUnit and the RESTful web service Client API to write tests. In testing the functionality of the application, the scopes and dependencies are being tested.
Create theInventoryEndpointITclass.inventory/src/test/java/it/io/openliberty/guides/inventory/InventoryEndpointIT.java
InventoryEndpointIT.java
See the following descriptions of the test cases:
-
testGetSystems()verifies that the hostname and the system load for each system in the inventory are not empty. -
testGetSystemsWithHost()verifies that the hostname and system load returned by thesystemmicroservice match the ones stored in theinventorymicroservice and ensures they are not empty. -
testUnknownHost()verifies that an unknown host or a host that does not expose their JVM system properties is correctly handled as an error.
Running the tests
Because you started Open Liberty in dev mode, you can run the tests by pressing the enter/return key from the command-line session where you started dev mode for the inventory microservice.
If the tests pass, you see a similar output to the following example:
-------------------------------------------------------
 T E S T S
-------------------------------------------------------
Running it.io.openliberty.guides.inventory.InventoryEndpointIT
Tests run: 3, Failures: 0, Errors: 0, Skipped: 0, Time elapsed: 0.325 sec - in it.io.openliberty.guides.inventory.InventoryEndpointIT

Results :

Tests run: 3, Failures: 0, Errors: 0, Skipped: 0
When you are done checking out the application, stop the Liberty instances by pressing CTRL+C in each command-line session where you ran the system and inventory microservices.
Optional: Using IBM MQ as the messaging server
The application has been built and tested. In this section, you’ll learn how to configure Liberty to use IBM MQ container as the messaging server instead of the embedded Liberty Messaging Server.
WINDOWS
MAC
LINUX
Start IBM MQ by running the following command on the command-line session:
docker pull icr.io/ibm-messaging/mq:9.4.0.0-r3

docker volume create qm1data

docker run ^
--env LICENSE=accept ^
--env MQ_QMGR_NAME=QM1 ^
--volume qm1data:/mnt/mqm ^
--publish 1414:1414 --publish 9443:9443 ^
--detach ^
--env MQ_APP_PASSWORD=passw0rd ^
--env MQ_ADMIN_PASSWORD=passw0rd ^
--rm ^
--platform linux/amd64 ^
--name QM1 ^
icr.io/ibm-messaging/mq:9.4.0.0-r3
If you’re an Intel-based Mac user, start IBM MQ by running the following command on the command-line session:
docker pull icr.io/ibm-messaging/mq:9.4.0.0-r3

docker volume create qm1data

docker run \
--env LICENSE=accept \
--env MQ_QMGR_NAME=QM1 \
--volume qm1data:/mnt/mqm \
--publish 1414:1414 --publish 9443:9443 \
--detach \
--env MQ_APP_PASSWORD=passw0rd \
--env MQ_ADMIN_PASSWORD=passw0rd \
--rm \
--platform linux/amd64 \
--name QM1 \
icr.io/ibm-messaging/mq:9.4.0.0-r3
If you’re an ARM-based Mac user, check out the How to build Mac IBM MQ container image blog in the IBM TechXchange Community website for building IBM MQ container image.
Navigate to an empty directory for building the IBM MQ Docker container image and run the following commands:
git clone https://github.com/ibm-messaging/mq-container.git -b 9.4.0.0-r3
cd mq-container
make build-devserver COMMAND=docker
After building the container image, you can find the image version:
docker images | grep mq
When the container image is built, you see an image similar to the ibm-mqadvanced-server-dev:9.4.0.0-arm64. Now, you can start IBM MQ by running the following command on the command-line session:
docker volume create qm1data

docker run \
--env LICENSE=accept \
--env MQ_QMGR_NAME=QM1 \
--volume docker:/mnt/mqm \
--publish 1414:1414 --publish 9443:9443 \
--detach \
--env MQ_APP_PASSWORD=passw0rd \
--env MQ_ADMIN_PASSWORD=passw0rd \
--name QM1 ibm-mqadvanced-server-dev:9.4.0.0-arm64
Start IBM MQ by running the following command on the command-line session:
docker pull icr.io/ibm-messaging/mq:9.4.0.0-r3

docker volume create qm1data

docker run \
--env LICENSE=accept \
--env MQ_QMGR_NAME=QM1 \
--volume qm1data:/mnt/mqm \
--publish 1414:1414 --publish 9443:9443 \
--detach \
--env MQ_APP_PASSWORD=passw0rd \
--env MQ_ADMIN_PASSWORD=passw0rd \
--rm \
--platform linux/amd64 \
--name QM1 \
icr.io/ibm-messaging/mq:9.4.0.0-r3
When the IBM MQ container is running, you can access the https://localhost:9443/ibmmq/console URL.
Replace thepom.xmlfile of the inventory service.inventory/pom.xml
inventory/pom.xml
Add the liberty.var.ibmmq-* properties for the IBM MQ container. You can change to different values when you deploy the application on a production environment without modifying the Liberty server.xml configuration file.
Replace theserver.xmlfile of the inventory service.inventory/src/main/liberty/config/server.xml
inventory/server.xml
Refine the jmsQueue and jmsActivationSpec configurations with the variables for IBM MQ settings. Add the resourceAdapter element to define the RAR file that provides the IBM MQ classes for Java and JMS. Note that the messagingEngine and jmsConnectionFactory configurations are removed from the configuration because they are no longer required.
Replace thepom.xmlfile of the system service.system/pom.xml
system/pom.xml
Add the liberty.var.ibmmq-* properties for the IBM MQ container as you did for the inventory microservice previously.
Replace theserver.xmlfile of the system service.system/src/main/liberty/config/server.xml
system/server.xml
Replace the properties.wasJms configuration by the properties.wmqjmsra configuration. All property values are defined in the pom.xml file that you replaced. Also, modify the jmsQueue property to set the baseQueueName value with the ${ibmmq-inventory-queue-name} variable. Add the resourceAdapter element like you did for the inventory microservice.
Start the inventory microservice by running the following command in dev mode:
WINDOWS
MAC
LINUX
mvnw.cmd -pl inventory liberty:dev./mvnw -pl inventory liberty:devNext, open another command-line session, navigate to the start directory, and start the system microservice by using the following command:
WINDOWS
MAC
LINUX
mvnw.cmd -pl system liberty:dev./mvnw -pl system liberty:devWhen you see the following message, your Liberty instances are ready in dev mode:
The defaultServer server is ready to run a smarter planet.
You can access the inventory microservice by the http://localhost:9081/inventory/systems URL.
In the command shell where inventory dev mode is running, press enter/return to run the tests. If the tests pass, you’ll see output that is similar to the following example:
-------------------------------------------------------
 T E S T S
-------------------------------------------------------
Running it.io.openliberty.guides.inventory.InventoryEndpointIT
Tests run: 3, Failures: 0, Errors: 0, Skipped: 0, Time elapsed: 0.325 sec - in it.io.openliberty.guides.inventory.InventoryEndpointIT

Results :

Tests run: 3, Failures: 0, Errors: 0, Skipped: 0
After you are finished checking out the application, stop the Liberty instances by pressing CTRL+C in the command-line sessions where you ran the system and inventory microservices.
Run the following commands to stop the running IBM MQ container and clean up the qm1data volume:
docker stop QM1
docker rm QM1
docker volume remove qm1data
Great work! You’re done!
You just developed a Java cloud-native application that uses Jakarta Messaging to produce and consume messages in Open Liberty.
Guide Attribution
Producing and consuming messages in Java microservices by {guide-author} is licensed under CC BY-ND 4.0

Copied to clipboard
Prerequisites:
Great work! You're done!
What did you think of this guide?


Thank you for your feedback!
What could make this guide better?
Raise an issue to share feedback
Create a pull request to contribute to this guide
Need help?
Ask a question on Stack Overflow


