
Contents
- What you’ll learn
- Additional prerequisites
- Getting started
- Installing the Operators
- Deploying the Kafka cluster to OpenShift
- Deploying the system and inventory microservices to OpenShift
- Accessing the inventory microservice
- Scaling up the system microservices
- Tearing down the environment
- Great work! You’re done!
- Related Links
- Guide Attribution
Tags
Deploying microservices to OpenShift 4 using Kubernetes Operators
Prerequisites:
Table of contents
Explore how to deploy microservices to Red Hat OpenShift 4 using Kubernetes Operators.
What you’ll learn
You will learn how to deploy a cloud-native application with 2 microservices to Red Hat OpenShift 4 using Kubernetes Operators like the Open Liberty Operator. You will install two operators into an OpenShift cluster and use them to deploy and scale sample microservices.
OpenShift is a Kubernetes-based platform with added functions. It streamlines the DevOps process by providing an intuitive development pipeline. It also provides integration with multiple tools to make the deployment and management of cloud applications easier. You can learn more about Kubernetes by checking out the Deploying microservices to Kubernetes guide.
Kubernetes operators provide an easy way to automate the management and updating of applications by abstracting away some of the details of cloud application management. To learn more about operators, check out this Operators tech topic article.
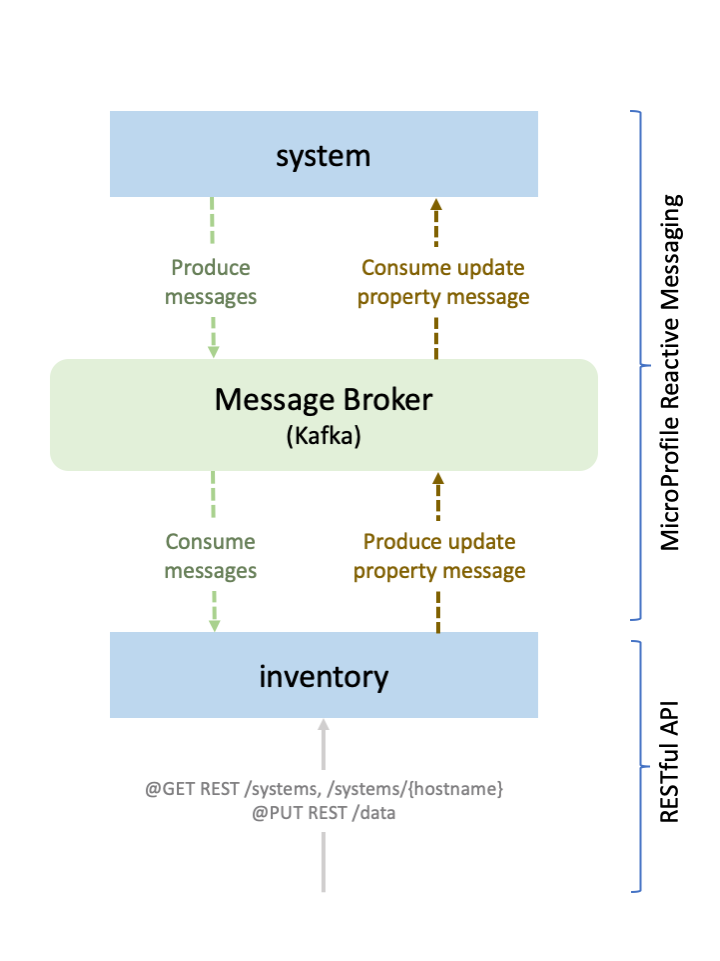
The application in this guide consists of two microservices, system and inventory. Every 15 seconds, the system
microservice calculates and publishes events that contain its current average system load. The inventory microservice
subscribes to that information so that it can keep an updated list of all the system microservices and their current system loads.
The following figure shows the application that you deploy, which consists of two microservices, system and inventory, connected by a message broker:
You will deploy the two Open Liberty microservices by using the Open Liberty Operator, and deploy Kafka using the Strimzi Operator.
The Open Liberty Operator provides a method of packaging,
deploying, and managing Open Liberty applications on Kubernetes-based clusters.
The Open Liberty Operator watches Open Liberty resources and creates various Kubernetes resources,
including Deployments, Services, and Routes, depending on the configurations.
The Operator then continuously compares the current state of the resources, the desired state
of application deployment, and reconciles them when necessary.
To learn more about the Strimzi Operator, visit their official website.
You can learn more about how the reactive Java services used in this guide work by checking out the
Creating reactive Java microservices guide.
Additional prerequisites
Before you can deploy your microservices, you must gain access to a cluster on OpenShift and have an OpenShift client installed. For client installation instructions, refer to the official OpenShift Online documentation.
There are various OpenShift offerings. You can gain access to an OpenShift cluster that is hosted on IBM Cloud, or check out other offerings from OpenShift.
After you get access to a cluster, make sure you are logged in to the cluster as a cluster administrator by running the following command:
oc versionLook for output similar to the following example:
Client Version: 4.17.6
Server Version: 4.17.3
Kubernetes Version: v1.30.5
Before you install any resources, you need to create a project on your OpenShift cluster.
Create a project named guide by running the following command:
oc new-project guideEnsure that you are working within the project guide by running the following command:
oc projectsLook for an asterisk (*) with the guide project in the list of projects to confirm that you are in the guide project, as shown in the following example:
You have access to the following projects and can switch between them with 'oc project <projectname>':

    default
  * guide
If the cert-manager is not installed on your cluster yet, install it by running the following command:
oc apply -f https://github.com/cert-manager/cert-manager/releases/download/v1.16.3/cert-manager.yamlFor more information, see the cert-manager installation documentation.
Getting started
The fastest way to work through this guide is to clone the Git repository into your cluster and use the projects that are provided inside:
git clone https://github.com/openliberty/guide-cloud-openshift-operator.git
cd guide-cloud-openshift-operator
cd start
The start directory contains the starting project that you will build upon.
The finish directory contains the finished project that you will build.
Installing the Operators
When you obtained your OpenShift cluster, you received login information for the OpenShift web console. The web console provides an interface to interact with your OpenShift cluster through your web browser.
To install the two Operators, navigate to the web console and select Operators > OperatorHub from the sidebar menu.
Search for and install the Open Liberty Operator and the Strimzi Operator. For the Strimzi Operator, install the latest version, not the stable version.
Make sure you install the Operators into the guide namespace.
Run the following command to view all the supported API resources that are available through the Open Liberty Operator:
oc api-resources --api-group=apps.openliberty.ioLook for the following output, which shows the custom resource definitions (CRDs) that can be used by the Open Liberty Operator:
NAME                      SHORTNAMES         APIGROUP              NAMESPACED   KIND
openlibertyapplications   olapp,olapps       apps.openliberty.io   true         OpenLibertyApplication
openlibertydumps          oldump,oldumps     apps.openliberty.io   true         OpenLibertyDump
openlibertytraces         oltrace,oltraces   apps.openliberty.io   true         OpenLibertyTrace
Each CRD defines a kind of object that can be used, which is specified in the previous example by the KIND value.
The SHORTNAME value specifies alternative names that you can substitute in the configuration to refer to an object kind.
For example, you can refer to the OpenLibertyApplication object kind by one of its specified shortnames, such as olapps.
The openlibertyapplications CRD defines a set of configurations for
deploying an Open Liberty-based application, including the application image, number of instances, and storage settings.
The Open Liberty Operator watches for changes to instances of the OpenLibertyApplication object kind and creates Kubernetes resources that are based on the configuration that is defined in the CRD.
Run the following command to all CRDs that the Strimzi Operator uses:
oc api-resources --api-group=kafka.strimzi.ioLook for the following output, which lists the CRDs that the Strimzi Operator uses, along with object kinds and shortnames.
NAME                 SHORTNAMES   APIGROUP           NAMESPACED   KIND
kafkabridges         kb           kafka.strimzi.io   true         KafkaBridge
kafkaconnectors      kctr         kafka.strimzi.io   true         KafkaConnector
kafkaconnects        kc           kafka.strimzi.io   true         KafkaConnect
kafkaconnects2is     kcs2i        kafka.strimzi.io   true         KafkaConnectS2I
kafkamirrormaker2s   kmm2         kafka.strimzi.io   true         KafkaMirrorMaker2
kafkamirrormakers    kmm          kafka.strimzi.io   true         KafkaMirrorMaker
kafkarebalances      kr           kafka.strimzi.io   true         KafkaRebalance
kafkas               k            kafka.strimzi.io   true         Kafka
kafkatopics          kt           kafka.strimzi.io   true         KafkaTopic
kafkausers           ku           kafka.strimzi.io   true         KafkaUser
You can also confirm the installation of the operators from the web console. Navigate to the OperatorHub. From the categories on the left, you can filter to see only installed operators.
Deploying the Kafka cluster to OpenShift
kafka.yaml
 1apiVersion: kafka.strimzi.io/v1beta2
 2kind: Kafka
 3metadata:
 4  name: kafka-cluster
 5spec:
 6  kafka:
 7    version: 3.8.0
 8    replicas: 1
 9    listeners:
10      - name: plain
11        port: 9092
12        type: internal
13        tls: false
14      - name: tls
15        port: 9093
16        type: internal
17        tls: true
18    config:
19      offsets.topic.replication.factor: 1
20      transaction.state.log.replication.factor: 1
21      transaction.state.log.min.isr: 1
22      default.replication.factor: 1
23      min.insync.replicas: 1
24      inter.broker.protocol.version: "3.8"
25    storage:
26      type: ephemeral
27  zookeeper:
28    replicas: 3
29    storage:
30      type: ephemeral
31  entityOperator:
32    topicOperator: {}
33    userOperator: {}
Apache Kafka is the messaging broker that is used in this application. The Strimzi Operator simplifies the deployment and management of Kafka clusters.
You can configure the specifics of the Strimzi Operator-controlled Kafka deployment with a YAML configuration file.
Ensure that you are in the start directory.
Create thekafka.yamlconfiguration file in thestartdirectory.kafka.yaml
The provided Kafka cluster configuration is based on the Strimzi Kafka ephemeral single example. For more information about the Kafka configuration file, check out the official Strimzi documentation
Run the following command to deploy Kafka by using the newly created configuration file:
oc apply -f kafka.yamlRun the following command to view the details of the deployment:
oc get kafka/kafka-cluster -o yamlIn the status section under conditions you can see a report similar to the following example when the cluster is ready:
- lastTransitionTime: 2024-03-28T19:27:00+0000
  status: "True"
  type: Ready
Deploying the system and inventory microservices to OpenShift
build.yaml
 1apiVersion: template.openshift.io/v1
 2kind: Template
 3metadata:
 4  name: "build-template"
 5  annotations:
 6    description: "Build template for the system and inventory service"
 7    tags: "build"
 8objects:
 9    # tag::imageStream[]
10  - apiVersion: v1
11    kind: ImageStream
12    metadata:
13      name: "${APP_NAME}-imagestream"
14      labels:
15        name: "${APP_NAME}"
16    # end::imageStream[]
17    # tag::buildConfig[]
18  - apiVersion: v1
19    kind: BuildConfig
20    metadata:
21      name: "${APP_NAME}-buildconfig"
22      labels:
23        name: "${APP_NAME}"
24    spec:
25      # tag::source[]
26      source:
27        # tag::binary[]
28        type: Binary
29        # end::binary[]
30      # end::source[]
31      # tag::docker[]
32      strategy:
33        type: Docker
34      # end::docker[]
35      output:
36        to:
37          kind: ImageStreamTag
38          name: "${APP_NAME}-imagestream:1.0-SNAPSHOT"
39    # end::buildConfig[]
40# tag::appname[]
41parameters:
42- description: The application name [system|inventory]
43  name: APP_NAME
44# end::appname[]
To deploy the system and inventory microservices, you must first package the microservices, then create and
run an OpenShift build to produce runnable container images of the packaged microservices.
Packaging the microservices
Ensure that you are in the start directory and run the following commands to package the system and inventory
microservices:
WINDOWS
MAC
LINUX
Open command prompt as an administrator and run the following command.
mvnw.cmd -pl models clean install
mvnw.cmd clean package
./mvnw -pl models clean install
./mvnw clean package./mvnw -pl models clean install
./mvnw clean packageBuilding and pushing the images
Create a build template to configure how to build your container images.
Create thebuild.yamltemplate file in thestartdirectory.build.yaml
The build.yaml template includes two objects.
The ImageStream object provides an abstraction from the image in the image registry.
This allows you to reference and tag the image.
The image registry used is the integrated internal OpenShift Container Registry.
The BuildConfig object defines a single
build definition and any triggers that kickstart the build. The source spec defines the build input. In this case,
the build inputs are your binary (local) files, which are streamed to OpenShift for the build.
The uploaded files need to include the packaged WAR application binaries, which is why you needed to run the Maven commands. The template specifies
a Docker strategy build, which invokes the docker build command, and creates a runnable container image of the microservice
from the build input. The template is parameterized with the APP_NAME parameter so that you can use the same
template to create the objects for the system and inventory microservices separately.
Run the following commands to create the objects for the system and inventory microservices:
oc process -f build.yaml -p APP_NAME=system | oc create -f -
oc process -f build.yaml -p APP_NAME=inventory | oc create -f -
Next, run the following commands to view the newly created ImageStream objects and the build configurations for each microservice:
oc get all -l name=system
oc get all -l name=inventory
Look for the following resources:
NAME                                                TYPE     FROM     LATEST
buildconfig.build.openshift.io/system-buildconfig   Docker   Binary   0

NAME                                                IMAGE REPOSITORY                                                            TAGS           UPDATED
imagestream.image.openshift.io/system-imagestream   image-registry.openshift-image-registry.svc:5000/guide/system-imagestream   1.0-SNAPSHOT   2 days ago

...

NAME                                                   TYPE     FROM     LATEST
buildconfig.build.openshift.io/inventory-buildconfig   Docker   Binary   2

NAME                                                   IMAGE REPOSITORY                                                               TAGS           UPDATED
imagestream.image.openshift.io/inventory-imagestream   image-registry.openshift-image-registry.svc:5000/guide/inventory-imagestream   1.0-SNAPSHOT   2 days ago
Ensure that you are in the start directory and trigger the builds by running the following commands:
oc start-build system-buildconfig --from-dir=system/.
oc start-build inventory-buildconfig --from-dir=inventory/.
The local system and inventory directories are uploaded to OpenShift to be built into the Docker images. Run the
following command to list the builds and track their status:
oc get buildsLook for the output that is similar to the following example:
NAME                      TYPE     FROM             STATUS     STARTED
system-buildconfig-1      Docker   Binary@f24cb58   Running    45 seconds ago
inventory-buildconfig-1   Docker   Binary@f24cb58   Running    13 seconds ago
You may need to wait some time until the build is complete. To check whether the build is complete, run the following
commands to view the build logs until the Push successful message appears:
oc logs build/system-buildconfig-1
oc logs build/inventory-buildconfig-1
Checking the images
During the build process, the images associated with the ImageStream objects that you created earlier
were pushed to the image registry and tagged. Run the following command to view the newly updated ImageStream objects:
oc get imagestreamsRun the following commands to get more details on the newly pushed images within the streams:
oc describe imagestream/system-imagestream
oc describe imagestream/inventory-imagestream
The following example shows part of the system-imagestream output:
Name:                     system-imagestream
Namespace:                guide
Created:                  2 minutes ago
Labels:                   name=system
Annotations:              <none>
Image Repository:         image-registry.openshift-image-registry.svc:5000/guide/system-imagestream
Image Lookup:             local=false
Unique Images:            1
Tags:                     1

...
Look for similar output for inventory-imagestream.
Now you’re ready to deploy the images.
Deploying the images
deploy.yaml
You can configure the specifics of the Open Liberty Operator-controlled deployment with a YAML configuration file.
Create thedeploy.yamlconfiguration file in thestartdirectory.deploy.yaml
The deploy.yaml file is configured to deploy two OpenLibertyApplication
resources, system and inventory, which are controlled by
the Open Liberty Operator.
The applicationImage parameter defines what container image is deployed as part of the OpenLibertyApplication CRD.
This parameter follows the <project-name>/<image-stream-name>[:tag] format.
The parameter can also point to an image hosted on an external registry, such as Docker Hub.
The system microservice is configured to use the image created from the earlier build.
One of the benefits of using ImageStream objects is that the operator redeploys the application when it detects a new image is pushed.
The env parameter is used to specify environment variables that are passed to the container at runtime.
You need to specify the bootstrap address required to communicate with the deployed Kafka cluster as an environment variable.
Update the [kafka-bootstrap-address] variable to the
bootstrap address found by running the following command:
oc describe kafka kafka-cluster | grep -B1 "Name:\s*plain" | grep "Bootstrap Servers:" | awk '{print $3}'You will see output similar to the following example:
kafka-cluster-kafka-bootstrap.guide.svc:9092The inventory microservice is configured
similarly to the system microservice.
Additionally, the inventory microservice includes the service
and expose parameters.
The service.port parameter specifies which port is exposed by the container,
allowing the microservice to be accessed from outside the container.
To access the microservice from outside of the cluster,
it must be exposed by setting the expose parameter to true.
After you expose the microservice, the Operator automatically creates and configures routes for external access to your microservice.
Run the following command to deploy the system and inventory microservices with the previously explained configurations:
oc apply -f deploy.yamlNext, run the following command to view your newly created OpenLibertyApplications resources:
oc get OpenLibertyApplicationsYou can also replace OpenLibertyApplications with the shortname olapps.
Look for output that is similar to the following example:
NAME IMAGE EXPOSED RECONCILED AGE
inventory guide/inventory-imagestream:1.0-SNAPSHOT true True 10s
system guide/system-imagestream:1.0-SNAPSHOT True 10sA RECONCILED state value of True indicates that the operator was able to successfully process the OpenLibertyApplications instances.
Run the following commands to view details of your microservices:
oc describe olapps/system
oc describe olapps/inventoryThis example shows part of the olapps/system output:
Name: system
Namespace: guide
Labels: app.kubernetes.io/part-of=system
name=system
Annotations: kubectl.kubernetes.io/last-applied-configuration:
{"apiVersion":"apps.openliberty.io/v1","kind":"OpenLibertyApplication","metadata":{"annotations":{},"labels":{"name":"system"},"name":"sys...
API Version: apps.openliberty.io/v1
Kind: OpenLibertyApplication
...Look for a similar output for olapps/inventory.
Accessing the inventory microservice
To access the exposed inventory microservice, run the following command and make note of the HOST:
oc get routesLook for an output that is similar to the following example:
NAME HOST/PORT PATH SERVICES PORT TERMINATION WILDCARD
inventory inventory-guide.apps.lights.os.fyre.ibm.com inventory 9448-tcp NoneVisit the inventory microservice by going to the following URL:
https://[HOST]/inventory/systems
Make sure to substitute the appropriate HOST value.
For example, using the output from the command above, inventory-guide.apps.lights.os.fyre.ibm.com is the HOST.
The following example shows this value substituted for HOST in the URL:
https://inventory-guide.apps.lights.os.fyre.ibm.com/inventory/systems.
Look for a JSON response that is similar to the following example:
[
{
"hostname": "system-7cbc47455c-664wh",
"systemLoad": 1.15
}
]This sample output was formatted for readability. Your output might not be formatted.
Scaling up the system microservices
deploy.yaml
 1# tag::system[]
 2apiVersion: apps.openliberty.io/v1
 3# tag::olapp1[]
 4kind: OpenLibertyApplication
 5# end::olapp1[]
 6metadata:
 7  name: system
 8  labels:
 9    name: system
10spec:
11  # tag::sysImage[]
12  applicationImage: guide/system-imagestream:1.0-SNAPSHOT
13  # end::sysImage[]
14  # tag::replicas[]
15  replicas: 3
16  # end::replicas[]
17  # tag::systemEnv[]
18  env:
19    - name: WLP_LOGGING_MESSAGE_FORMAT
20      value: "json"
21    - name: WLP_LOGGING_MESSAGE_SOURCE
22      value: "message,trace,accessLog,ffdc,audit"
23    - name: MP_MESSAGING_CONNECTOR_LIBERTY_KAFKA_BOOTSTRAP_SERVERS
24      # tag::bootstrap[]
25      value: "[kafka-bootstrap-address]"
26      # end::bootstrap[]
27  # end::systemEnv[]
28# end::system[]
29---
30# tag::inventory[]
31apiVersion: apps.openliberty.io/v1
32# tag::olapp2[]
33kind: OpenLibertyApplication
34# end::olapp2[]
35metadata:
36  name: inventory
37  labels:
38    name: inventory
39spec:
40  # tag::invImage[]
41  applicationImage: guide/inventory-imagestream:1.0-SNAPSHOT
42  # end::invImage[]
43  # tag::service[]
44  service:
45    # tag::servicePort[]
46    port: 9448
47    # end::servicePort[]
48  # end::service[]
49  # tag::expose[]
50  expose: true
51  # end::expose[]
52  env:
53    - name: WLP_LOGGING_MESSAGE_FORMAT
54      value: "json"
55    - name: WLP_LOGGING_MESSAGE_SOURCE
56      value: "message,trace,accessLog,ffdc,audit"
57    - name: MP_MESSAGING_CONNECTOR_LIBERTY_KAFKA_BOOTSTRAP_SERVERS
58      # tag::bootstrapInv[]
59      value: "[kafka-bootstrap-address]"
60      # end::bootstrapInv[]
61# end::inventory[]The inventory microservice displays the hostname and systemLoad of all system microservices that are publishing
messages to the Kafka broker. Because only one system pod is running, only one element displays in the inventory microservice.
Scaling up microservices is easy with Operators. Simply update the deploy.yaml file with the replica: n parameter,
where n is the number of instances that you want.
Update thedeploy.yamlconfiguration file in thestartdirectory.deploy.yaml
Add the replicas parameter to the system configuration.
Run the following command to update the system resource:
oc apply -f deploy.yamlLook for the following output:
openlibertyapplications.apps.openliberty.io/system configured
openlibertyapplications.apps.openliberty.io/inventory unchanged
Notice that only the system resource was updated because there was a change in its specification. The inventory
resource was left unchanged.
Run the following command to see the newly scaled up system pods:
oc get podsWhen you see a status of Running on all of the system pods, your application is ready.
Revisit the inventory microservice and you can now see three instances of the system microservice listed in the inventory endpoint:
[
    {
        "hostname": "system-5bb7b86fd5-b5plz",
        "systemLoad": 2.73
    },
    {
        "hostname": "system-5bb7b86fd5-fkd5j",
        "systemLoad": 2.95
    },
    {
        "hostname": "system-5bb7b86fd5-pgcbf",
        "systemLoad": 2.73
    }
]
Tearing down the environment
When you no longer need your project, switch to another project and delete the project guide by running the following command:
oc delete project guideThis command deletes all the applications and resources.
Great work! You’re done!
You just deployed two microservices running in Open Liberty to OpenShift by using the Open Liberty Operator.
Related Links
Guide Attribution
Deploying microservices to OpenShift 4 using Kubernetes Operators by Open Liberty is licensed under CC BY-ND 4.0

Copied to clipboard
Prerequisites:
Great work! You're done!
What did you think of this guide?


Thank you for your feedback!
What could make this guide better?
Raise an issue to share feedback
Create a pull request to contribute to this guide
Need help?
Ask a question on Stack Overflow


