az --version
Contents
- What you’ll learn
- Additional prerequisites
- Getting started
- Provisioning resources for Liberty on AKS
- Uploading images to a container registry
- Accessing and configuring an AKS cluster
- Deploying microservices to AKS
- Testing the microservices
- Tearing down the environment
- Great work! You’re done!
- Guide Attribution
Tags
Deploying microservices to Azure Kubernetes Service
Prerequisites:
Table of contents
Explore how to deploy microservices to Azure Kubernetes Service (AKS) on Microsoft Azure.
What you’ll learn
You will learn how to deploy two microservices in Open Liberty containers to a Kubernetes cluster on Azure Kubernetes Service (AKS).
Kubernetes is an open source container orchestrator that automates many tasks involved in deploying, managing, and scaling containerized applications. To learn more about Kubernetes and how to use it with the Open Liberty Operator, check out the Deploying a microservice to Kubernetes using Open Liberty Operator guide.
There are different cloud-based solutions for running your Kubernetes workloads. A cloud-based infrastructure enables you to focus on developing your microservices without worrying about low-level infrastructure details for deployment. Using a cloud helps you to easily scale and manage your microservices in a high-availability setup.
Azure offers a managed Kubernetes service called Azure Kubernetes Service (AKS). Using AKS simplifies the process of running Kubernetes on Azure without needing to install or maintain your own Kubernetes control plane. It provides a hosted Kubernetes cluster that you can deploy your microservices to. You will use AKS with Azure Container Registry (ACR). ACR is a private registry that is used to store and distribute your container images. Because AKS is not free, a cost might be associated with running this guide. See the official AKS pricing documentation for more details.
This guide will introduce the IBM WebSphere Liberty and Open Liberty on AKS plan, a solution that automates most of the standard steps for provisioning WebSphere Liberty or Open Liberty on an AKS cluster. Once the initial provisioning is complete, you can further customize your deployments as needed.
The two microservices you will deploy are called system and inventory.
The system microservice returns the JVM system properties of the running container.
It also returns the name of the pod in the HTTP header, making replicas easy to distinguish from each other.
The inventory microservice adds the properties from the system microservice to the inventory.
This demonstrates how communication can be established between pods inside a cluster.
Additional prerequisites
Before you begin, the following additional tools need to be installed:
-
Docker: You need a containerization software for building containers. Kubernetes supports various container types, but you will use Docker in this guide. For installation instructions, refer to the official Docker documentation. If you already have Docker installed, make sure to have it running.
-
Azure subscription: To run this guide, you will need an Azure subscription. Navigate to the Microsoft Azure Purchase Options to create an account with your email and start a Pay-As-You-Go subscription.
-
IBM WebSphere Liberty and Open Liberty on AKS plan: You will need to use the IBM WebSphere Liberty and Open Liberty on AKS plan on Azure marketplace. See the official Create a Liberty on AKS deployment using the portal documentation for more information. Or, you can go directly to the plan. To use this plan, you must have one of the following Azure role-based access control sets: Contributor and User Access Administrator together, or Owner of the current subscription.
-
Azure CLI: You will need to use the Azure Command Line Interface (CLI). See the official Install the Azure CLI documentation for information about setting up the Azure CLI for your platform. To verify that the Azure CLI is installed correctly, run the following command:
-
kubectl: You need the Kubernetes command-line tool
kubectlto interact with your Kubernetes cluster. If you do not havekubectlinstalled already, use the Azure CLI to download and installkubectlwith the following command:
WINDOWS
MAC
LINUX
az aks install-clisudo az aks install-cliTo begin this guide, make sure that you are logged in to Azure to get access to your subscription:
az loginGetting started
The fastest way to work through this guide is to clone the Git repository and use the projects that are provided inside:
git clone https://github.com/openliberty/guide-cloud-azure.git
cd guide-cloud-azure
The start directory contains the starting project that you will build upon.
The finish directory contains the finished project that you will build.
Before you begin, make sure you have all the necessary prerequisites.
Provisioning resources for Liberty on AKS
To deploy your microservices to AKS with Liberty, you need to provision the necessary infrastructure. This involves creating an Azure Kubernetes Service (AKS) cluster to host your microservices and an Azure Container Registry (ACR) to store and manage the container images.
Creating a resource group
A resource group is an Azure construct to manage a logical collection of resources for your cloud deployments on Azure. You must create a resource group to hold and manage the resources you need for your Kubernetes deployment.
To create a resource group efficiently, navigate to the IBM WebSphere Liberty and Open Liberty on AKS plan and click Create to begin.
In the Basics pane, for the Resource group field, select Create new and enter guideGroup as the name of the resource group.
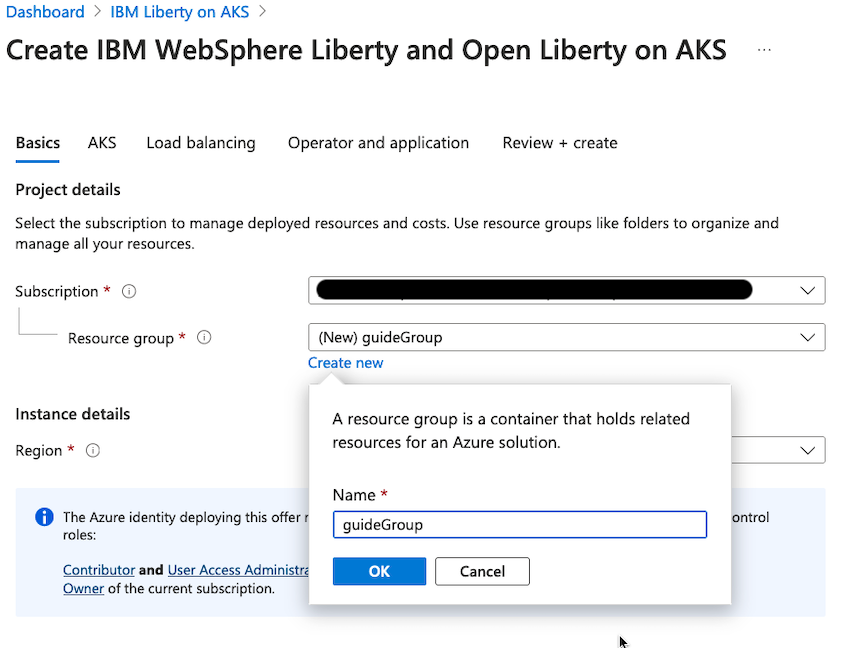
For the Region field, you must specify an Azure location. This location determines where the metadata for your resources is stored. If additional resources are created without specifying a location, they will default to the region you selected for the resource group. Click the Region drop-down menu and select the desired location.
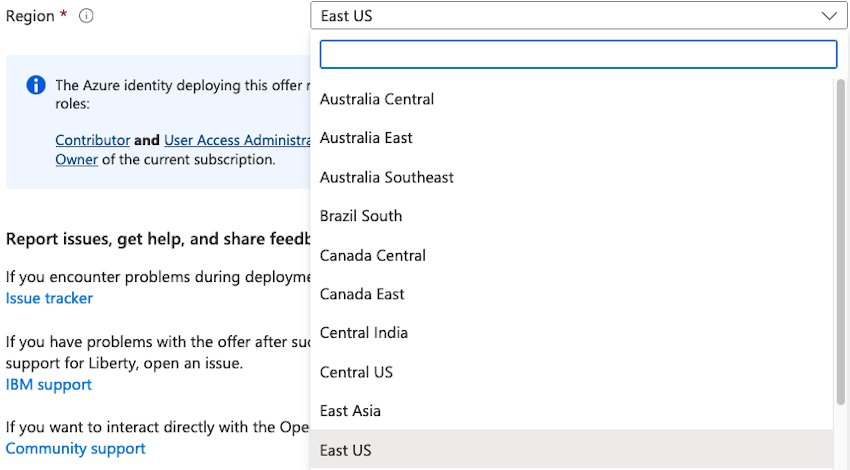
Note that AKS is not available in all regions. Make sure that the region you select is compatible with AKS.
Setting up ACR and Kubernetes cluster on AKS
After you set up the resource group, leave the remaining configuration at its default settings by skipping the AKS, Load balancing, and Operator and application panes. The default configuration automatically sets up an Azure Container Registry in the same region where your services are deployed, links it to your resource group, creates an AKS cluster, and deploys the Open Liberty Operator to manage your Open Liberty applications.
For more information on configuring these options, see the Create a Liberty on AKS deployment using the portal documentation.
After you review the configurations, select Review + create to validate your setup. After validation, click Create to initiate the deployment, which can take up to 20 minutes to complete. You’ll see a Deployment is in progress message, and when the deployment is complete, a Your deployment is complete message will confirm the creation of the ACR and AKS cluster.
Uploading images to a container registry
Once your Azure Container Registry (ACR) is created, you can containerize your microservices and upload their Docker images to the ACR for storage and deployment.
Logging into the container registry
Before uploading your images, you need to log in to your Azure Container Registry (ACR). Navigate to the resource group overview in the Azure Portal and locate the container registry that was created during the deployment. You will find the registry name listed under the Name column.
For example, in the following screenshot, the registry name is acrc75e71.
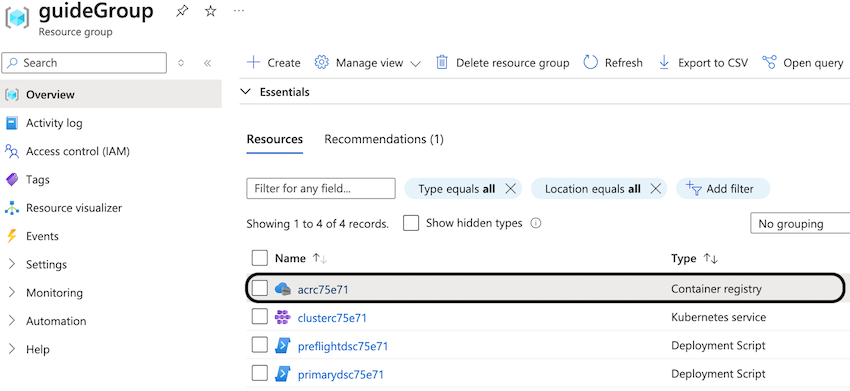
Use this registry name in place of [registry-name] in the upcoming commands.
Alternatively, if you prefer using the command line, you can retrieve the container registry information by running the following command:
az acr list --resource-group guideGroup --output tableThis command returns a table with the details of your ACR, including its name. Look for output similar to the following example:
NAME       RESOURCE GROUP    LOCATION    SKU    LOGIN SERVER          CREATION DATE         ADMIN ENABLED
---------  ----------------  ----------  -----  --------------------  --------------------  ---------------
acrc75e71  guideGroup        eastus      Basic  acrc75e71.azurecr.io  2024-08-09T17:53:38Z  True
Once you have the registry name, log in to your Azure Container Registry using the following command, replacing [registry-name] with the name of your container registry:
az acr login -n [registry-name]If the login is successful, you will see the following message:
Login Succeeded
Building your Docker images
The starting Java project, which you can find in the start directory, is a multi-module Maven
project. It is made up of the system and inventory microservices. Each microservice exists in its own directory,
start/system and start/inventory. Both of these directories contain a Dockerfile, which is necessary
for building the Docker images. If you’re unfamiliar with Dockerfiles, check out the
Containerizing microservices guide.
Navigate to the start directory and run the following command:
WINDOWS
MAC
LINUX
mvnw.cmd package./mvnw package./mvnw packageNow that your microservices are packaged, you can build the Docker images using the docker build commands. Ensure that Docker is installed and the Docker daemon is running before proceeding.
Run the following commands to build and containerize the application:
docker build --platform linux/amd64 -t system:1.0-SNAPSHOT system/.
docker build --platform linux/amd64 -t inventory:1.0-SNAPSHOT inventory/.
To verify that the images are built, run the docker images command to list all local Docker images:
docker imagesYour two images, system and inventory, are included in the list of all Docker images:
REPOSITORY    TAG             IMAGE ID        CREATED          SIZE
inventory     1.0-SNAPSHOT    08fef024e986    4 minutes ago    471MB
system        1.0-SNAPSHOT    1dff6d0b4f31    5 minutes ago    470MB
Pushing the images to a container registry
Pushing the images to a registry allows the cluster to create pods using your container images.
First, retrieve your registry server name, which typically be in the following format: [registry-name].azurecr.io. You can find the server name by running the following command:
az acr show -n [registry-name] --query loginServerLook for output similar to the following example.
"acr31a3a1.azurecr.io"
Tag your container images with your registry by the following commands. Substitute your registry server name for the [registry-server] value.
docker tag system:1.0-SNAPSHOT [registry-server]/system:1.0-SNAPSHOT
docker tag inventory:1.0-SNAPSHOT [registry-server]/inventory:1.0-SNAPSHOT
Finally, push your images to the registry by running the following commands:
docker push [registry-server]/system:1.0-SNAPSHOT
docker push [registry-server]/inventory:1.0-SNAPSHOT
Accessing and configuring an AKS cluster
Since your Azure Kubernetes Service (AKS) cluster is already set up, you can now access and configure it to deploy your microservices.
Connecting the AKS cluster to Kubernetes
To manage and interact with your AKS cluster using Kubernetes, you need to integrate the AKS cluster credentials into your local Kubernetes configuration. This integration allows your local Kubernetes CLI (kubectl) to communicate with the AKS cluster for deploying and managing resources.
To begin, obtain the information about the Kubernetes cluster created within the guideGroup resource group. You can find this information by either viewing the resource group overview in the Azure Portal or running the following command:
az aks list --resource-group guideGroup --output tableThe cluster name, formatted as clusterXXXXXX, is identified in the following output.
Name           Location    ResourceGroup    KubernetesVersion    CurrentKubernetesVersion    ProvisioningState    Fqdn
-------------  ----------  ---------------  -------------------  --------------------------  -------------------  -----------------------------------------------
clusterc75e71  eastus      guideGroup       1.29                 1.29.8                      Succeeded            clusterc75e71-dns-pazznf8n.hcp.eastus.azmk8s.io
Merge the credentials of your cluster into your current Kubernetes configuration by using the az aks get-credentials command. Replace [cluster-name] with the name of the cluster. The default Kubernetes configuration file that is updated with your cluster credentials is located within the ~/.kube/config filepath.
az aks get-credentials -g guideGroup -n [cluster-name]You will see an output similar to the following:
Merged [cluster-name] as current context in /Users/.kube/config
Run the following command to check the status of the available nodes in your AKS cluster:
kubectl get nodesThe kubectl get nodes command outputs information about the node. Ensure that the STATUS of the node is in the Ready state before you proceed.
NAME                                STATUS   ROLES    AGE   VERSION
aks-agentpool-15010410-vmss000000   Ready    <none>   65m   v1.29.8
Storing registry credentials in a secret
To be able to pull the images from your Azure container registry, the credentials of your registry must be added to your service through a secret.
View the password for your Azure container registry:
az acr credential show -n [registry-name] --query "passwords[0].value" -o tsvUse the kubectl create secret docker-registry command to create a secret to hold your registry credentials.
Replace [password] with the registry password that you viewed with the
az acr credential show -n [registry-name] command. The email that is associated with your Docker account replaces [email-address].
WINDOWS
MAC
LINUX
kubectl create secret docker-registry guidesecret ^
    --docker-server=[registry-server] ^
    --docker-username=[registry-name] ^
    --docker-password=[password] ^
    --docker-email=[email-address]
kubectl create secret docker-registry guidesecret \
--docker-server=[registry-server] \
--docker-username=[registry-name] \
--docker-password=[password] \
--docker-email=[email-address]The secret is successfully created with the following output:
secret/guidesecret created
Deploying microservices to AKS
Now that your container images are built and your Kubernetes cluster is ready, you can deploy your microservices using the Open Liberty Operator.
Creating a deployment definition
The Open Liberty Operator provides custom resource definitions (CRDs) that define how your Open Liberty applications are deployed. These CRDs are described in a YAML file, which outlines the deployment details and services required for your application. You can also delete any resources from the cluster by using the same YAML file that you used to deploy them. In this guide, the deploy.yaml resource definition file is provided for you. To learn more about deploying microservices using the Open Liberty Operator, check out the Deploying a microservice to Kubernetes using Open Liberty Operator guide.
Update thedeploy.yamlfile in thestartdirectory.deploy.yaml
Replace [registry-server] with your container registry server.
You can get the login server for your registry by running the az acr show -n [registry-name] --query loginServer command.
deploy.yaml
 1apiVersion: apps.openliberty.io/v1
 2# tag::sysCr[]
 3kind: OpenLibertyApplication
 4# end::sysCr[]
 5metadata:
 6  name: system-deployment
 7  labels:
 8    app: system
 9spec:
10  # tag::sysImage[]
11  applicationImage: "[registry-server]/system:1.0-SNAPSHOT"
12  # end::sysImage[]
13  service:
14    # tag::sysLoadBalancer[]
15    type: LoadBalancer
16    # end::sysLoadBalancer[]
17    port: 9080
18  expose: true
19  # tag::sysSecret[]
20  pullSecret: guidesecret
21  # end::sysSecret[]
22---
23apiVersion: apps.openliberty.io/v1
24# tag::invCr[]
25kind: OpenLibertyApplication
26# end::invCr[]
27metadata:
28  name: inventory-deployment
29  labels:
30    app: inventory
31spec:
32  # tag::invImage[]
33  applicationImage: "[registry-server]/inventory:1.0-SNAPSHOT"
34  # end::invImage[]
35  service:
36    # tag::invLoadBalancer[]
37    type: LoadBalancer
38    # end::invLoadBalancer[]
39    port: 9081
40  expose: true
41  # tag::invSecret[]
42  pullSecret: guidesecret
43  # end::invSecret[]
In the deploy.yaml file, the custom resource (CR) is specified to be OpenLibertyApplication. The applicationImage is the name and tag of the container image that you want
to use for the container. The deploy.yaml file references the images that you pushed to your registry
for the system and inventory repositories. These images can be pulled
with the secret that you defined before.
The service that is used to expose your deployments has a type of LoadBalancer.
This means you can access these services from IP addresses that forward incoming traffic to your nodepool via a specific port.
You can expose your services in other ways such as using a NodePort service type.
Deploying your application
To deploy your microservices to Azure Kubernetes Service, you need Kubernetes to create
the contents of the deploy.yaml file.
Run the following command to deploy the resources defined in the deploy.yaml file:
kubectl apply -f deploy.yamlYou will see an output similar to the following:
openlibertyapplication.apps.openliberty.io/system-deployment created
openlibertyapplication.apps.openliberty.io/inventory-deployment created
Run the following command to check the status of your pods:
kubectl get podsIf all the pods are healthy and running, you see an output similar to the following:
NAME                                    READY   STATUS    RESTARTS   AGE
inventory-deployment-5d6bcf79bc-nm6bm   1/1     Running   0          33s
system-deployment-f7757c55-2t7mk        1/1     Running   0          35s
Making requests to the microservices
You need the external IP addresses that are associated with the system and inventory services to try out your microservices.
Take note of the EXTERNAL-IP in the output of the following commands. It is the
hostname that you will later substitute into [EXTERNAL-IP] to access the system and inventory services.
View the information of the system service to see its EXTERNAL-IP address:
kubectl get service/system-deploymentYou need to wait a while for the EXTERNAL-IP to change from <pending> to an IP address.
NAME                TYPE           CLUSTER-IP     EXTERNAL-IP   PORT(S)          AGE
system-deployment   LoadBalancer   10.0.162.69    <pending>     9080:30260/TCP   3s
NAME                TYPE           CLUSTER-IP    EXTERNAL-IP     PORT(S)          AGE
system-deployment   LoadBalancer   10.0.162.69   135.237.37.69   9080:32480/TCP   16s
View the information of the inventory service to see its EXTERNAL-IP address:
kubectl get service/inventory-deploymentYou will need to wait a while for the EXTERNAL-IP to change from <pending> to an IP address.
NAME                   TYPE           CLUSTER-IP    EXTERNAL-IP   PORT(S)          AGE
inventory-deployment   LoadBalancer   10.0.96.147   <pending>     9081:30431/TCP   2s
NAME                   TYPE           CLUSTER-IP    EXTERNAL-IP      PORT(S)          AGE
inventory-deployment   LoadBalancer   10.0.96.147   135.237.38.19    9081:30431/TCP   74s
To access your microservices, point your browser to the following URLs, substituting the appropriate EXTERNAL-IP hostnames
for the system and inventory services:
-
http://[system-EXTERNAL-IP]:9080/system/properties -
http://[inventory-EXTERNAL-IP]:9081/inventory/systems
In the first URL, you see a result in JSON format with the system properties of the container JVM. The second URL returns an empty list, which is expected because no system properties are stored in the inventory yet.
Point your browser to the http://[inventory-EXTERNAL-IP]:9081/inventory/systems/[system-EXTERNAL-IP] URL. When you visit this URL, these system
properties are automatically stored in the inventory. Go back to http://[inventory-EXTERNAL-IP]:9081/inventory/systems and
you see a new entry for [system-EXTERNAL-IP].
Testing the microservices
A few tests are included for you to test the basic functionality of the microservices. If a test failure occurs, then you might have introduced a bug into the code. To run the tests, wait for all pods to be in the ready state before you proceed further.
pom.xml
  1<?xml version='1.0' encoding='utf-8'?>
  2<project xmlns="http://maven.apache.org/POM/4.0.0"
  3    xmlns:xsi="http://www.w3.org/2001/XMLSchema-instance"
  4    xsi:schemaLocation="http://maven.apache.org/POM/4.0.0 http://maven.apache.org/xsd/maven-4.0.0.xsd">
  5
  6    <modelVersion>4.0.0</modelVersion>
  7
  8    <groupId>io.openliberty.guides</groupId>
  9
 10    <artifactId>guide-cloud-azure-inventory</artifactId>
 11    <version>1.0-SNAPSHOT</version>
 12    <packaging>war</packaging>
 13
 14    <properties>
 15        <project.build.sourceEncoding>UTF-8</project.build.sourceEncoding>
 16        <project.reporting.outputEncoding>UTF-8</project.reporting.outputEncoding>
 17        <maven.compiler.source>11</maven.compiler.source>
 18        <maven.compiler.target>11</maven.compiler.target>
 19        <!-- Default test properties -->
 20        <!-- tag::sysHttpPort[] -->
 21        <sys.http.port>9080</sys.http.port>
 22        <!-- end::sysHttpPort[] -->
 23        <!-- tag::invHttpPort[] -->
 24        <inv.http.port>9081</inv.http.port>
 25        <!-- end::invHttpPort[] -->
 26        <inv.https.port>9444</inv.https.port>
 27        <!-- tag::sysKubeService[] -->
 28        <system.ip>system-service</system.ip>
 29        <!-- end::sysKubeService[] -->
 30        <!-- tag::invKubeService[] -->
 31        <inventory.ip>inventory-service</inventory.ip>
 32        <!-- end::invKubeService[] -->
 33        <!-- Liberty configuration -->
 34        <liberty.var.system.http.port>${sys.http.port}</liberty.var.system.http.port>
 35        <liberty.var.http.port>${inv.http.port}</liberty.var.http.port>
 36        <liberty.var.https.port>${inv.https.port}</liberty.var.https.port>
 37    </properties>
 38
 39    <dependencies>
 40        <!-- Provided dependencies -->
 41        <dependency>
 42            <groupId>jakarta.platform</groupId>
 43            <artifactId>jakarta.jakartaee-api</artifactId>
 44            <version>10.0.0</version>
 45            <scope>provided</scope>
 46        </dependency>
 47        <dependency>
 48            <groupId>org.eclipse.microprofile</groupId>
 49            <artifactId>microprofile</artifactId>
 50            <version>7.1</version>
 51            <type>pom</type>
 52            <scope>provided</scope>
 53        </dependency>
 54        <!-- For tests -->
 55        <dependency>
 56            <groupId>org.junit.jupiter</groupId>
 57            <artifactId>junit-jupiter</artifactId>
 58            <version>5.14.0</version>
 59            <scope>test</scope>
 60        </dependency>
 61        <dependency>
 62            <groupId>org.jboss.resteasy</groupId>
 63            <artifactId>resteasy-client</artifactId>
 64            <version>6.2.14.Final</version>
 65            <scope>test</scope>
 66        </dependency>
 67        <dependency>
 68            <groupId>org.jboss.resteasy</groupId>
 69            <artifactId>resteasy-json-binding-provider</artifactId>
 70            <version>6.2.14.Final</version>
 71            <scope>test</scope>
 72        </dependency>
 73        <dependency>
 74            <groupId>org.glassfish</groupId>
 75            <artifactId>jakarta.json</artifactId>
 76            <version>2.0.1</version>
 77            <scope>test</scope>
 78        </dependency>
 79    </dependencies>
 80
 81    <build>
 82        <finalName>${project.artifactId}</finalName>
 83        <plugins>
 84            <plugin>
 85                <groupId>org.apache.maven.plugins</groupId>
 86                <artifactId>maven-war-plugin</artifactId>
 87                <version>3.5.0</version>
 88            </plugin>
 89            <!-- Enable Liberty Maven plugin -->
 90            <plugin>
 91                <groupId>io.openliberty.tools</groupId>
 92                <artifactId>liberty-maven-plugin</artifactId>
 93                <version>3.11.5</version>
 94            </plugin>
 95            <!-- Plugin to run unit tests -->
 96            <plugin>
 97                <groupId>org.apache.maven.plugins</groupId>
 98                <artifactId>maven-surefire-plugin</artifactId>
 99                <version>3.5.4</version>
100            </plugin>
101            <!-- Plugin to run functional tests -->
102            <plugin>
103                <groupId>org.apache.maven.plugins</groupId>
104                <artifactId>maven-failsafe-plugin</artifactId>
105                <version>3.5.4</version>
106                <configuration>
107                    <systemPropertyVariables>
108                        <system.ip>${system.ip}</system.ip>
109                        <inventory.ip>${inventory.ip}</inventory.ip>
110                        <system.http.port>${sys.http.port}</system.http.port>
111                        <inventory.http.port>${inv.http.port}</inventory.http.port>
112                    </systemPropertyVariables>
113                </configuration>
114            </plugin>
115        </plugins>
116    </build>
117</project>
The default properties that are defined in the pom.xml file are:
| Property | Description |
|---|---|
|
Name of the Kubernetes Service wrapping the |
|
Name of the Kubernetes Service wrapping the |
|
The HTTP port for the Kubernetes Service |
|
The HTTP port of the Kubernetes Service |
Running the tests
Run the Maven failsafe:integration-test goal to test your microservices by replacing [system-EXTERNAL-IP] and [inventory-EXTERNAL-IP]
with the values that were determined in the previous section.
WINDOWS
MAC
LINUX
mvnw.cmd failsafe:integration-test -Dsystem.ip=[system-EXTERNAL-IP] -Dinventory.ip=[inventory-EXTERNAL-IP]./mvnw failsafe:integration-test -Dsystem.ip=[system-EXTERNAL-IP] -Dinventory.ip=[inventory-EXTERNAL-IP]./mvnw failsafe:integration-test -Dsystem.ip=[system-EXTERNAL-IP] -Dinventory.ip=[inventory-EXTERNAL-IP]If the tests pass, you will see an output similar to the following for each service:
-------------------------------------------------------
 T E S T S
-------------------------------------------------------
Running it.io.openliberty.guides.system.SystemEndpointIT
Tests run: 1, Failures: 0, Errors: 0, Skipped: 0, Time elapsed: 0.673 sec - in it.io.openliberty.guides.system.SystemEndpointIT

Results:

Tests run: 1, Failures: 0, Errors: 0, Skipped: 0
-------------------------------------------------------
 T E S T S
-------------------------------------------------------
Running it.io.openliberty.guides.inventory.InventoryEndpointIT
Tests run: 4, Failures: 0, Errors: 0, Skipped: 0, Time elapsed: 2.222 sec - in it.io.openliberty.guides.inventory.InventoryEndpointIT

Results:

Tests run: 4, Failures: 0, Errors: 0, Skipped: 0
Tearing down the environment
It is important to clean up your resources when you are finished with the guide so that you do not incur extra charges for ongoing usage.
When you no longer need your deployed microservices, you can delete all Kubernetes resources
by running the kubectl delete command:
kubectl delete -f deploy.yamlBecause you are done testing your cluster, clean up all of its related sources using the az group delete command.
This command removes the resource group, container service, and all related resources:
az group delete -g guideGroup --yes --no-waitGreat work! You’re done!
You have just deployed two microservices running in Open Liberty to Azure Kubernetes Service (AKS). You also
learned how to use kubectl to deploy your microservices on a Kubernetes cluster.
Guide Attribution
Deploying microservices to Azure Kubernetes Service by Open Liberty is licensed under CC BY-ND 4.0

Copied to clipboard
Prerequisites:
Great work! You're done!
What did you think of this guide?


Thank you for your feedback!
What could make this guide better?
Raise an issue to share feedback
Create a pull request to contribute to this guide
Need help?
Ask a question on Stack Overflow


