
Contents
- What you’ll learn
- Additional prerequisites
- Getting started
- Creating the application
- Configuring session persistence
- Running the application
- Starting and preparing your cluster for deployment
- Containerizing the application
- Deploying and running the application in Kubernetes
- Tearing down the environment
- Great work! You’re done!
- Guide Attribution
Tags
Caching HTTP session data using JCache and Hazelcast
Prerequisites:
Table of contents
Learn how to create, use, and cache HTTP session data for your application.
What you’ll learn
What is a session?
On the internet, a web server doesn’t know who you are or what you do because it’s processing stateless HTTP requests. An HTTP session provides a way to store information to be used across multiple requests. Session variables store user information like user name or items in a shopping cart. By default, session variables will timeout after 30 minutes of being unused. Cookies, which also store user information, are maintained on a client’s computer, whereas session variables are maintained on a web server. For security reasons, an HTTP session is preferred over cookies when used with sensitive data. A session hides data from users. Cookies can be manipulated by a savvy user to make fake requests to your site.
What is session persistence?
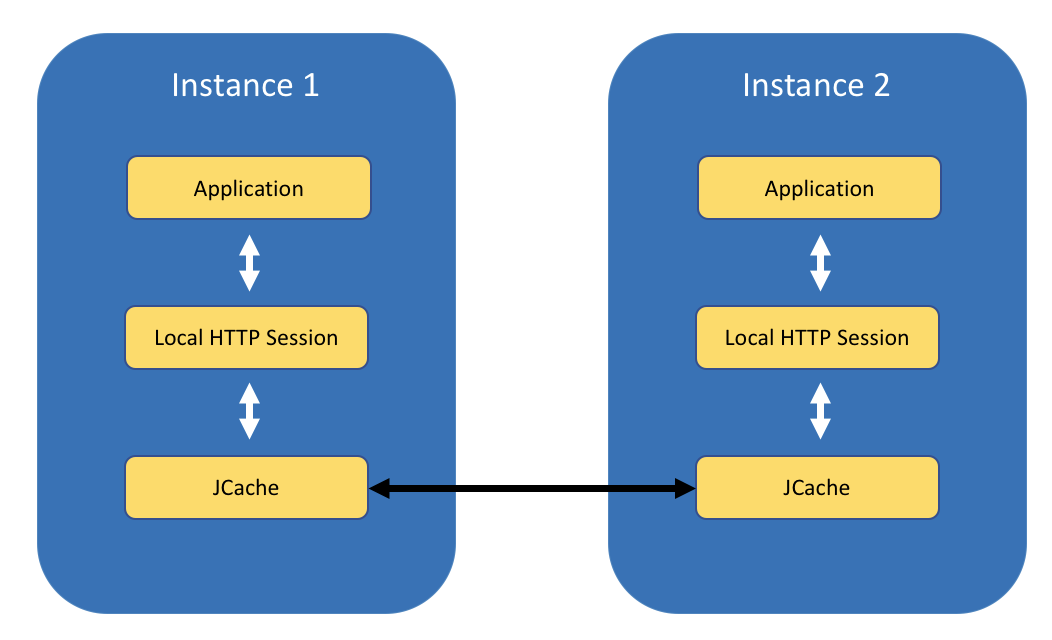
High traffic websites must support thousands of users in a fast and reliable way. Load balancing requires running several instances of the same application in parallel so that traffic can be routed to different instances to maximize speed and reliability. Unless a user is tied to a particular instance, running multiple instances of the same application can pose an out-of-sync problem when each instance keeps an isolated copy of its session data. HTTP session data caching can solve this problem by allowing all instances of the application to share caches among each other. Sharing caches among instances eliminates the need to route a user to the same instance and helps in failover situations by distributing the cache.
You will learn how to build an application that creates and uses HTTP session data.
You will also learn how to use Open Liberty’s sessionCache feature to persist HTTP sessions
by using Java Caching (JCache), the standard caching API for Java.
You will containerize and deploy the application to a local Kubernetes cluster. You will then replicate the application in multiple pods and see that the session data is cached and shared among all instances of the application. Even if an instance is unavailable, the other instances are able to take over and handle requests from the same user by using the cached session data.
Additional prerequisites
Before you begin, you need a containerization software for building containers. Kubernetes supports various container runtimes. You will use Docker in this guide. For Docker installation instructions, refer to the official Docker documentation.
WINDOWS
MAC
LINUX
Use Docker Desktop, where a local Kubernetes environment is pre-installed and enabled. If you do not see the Kubernetes tab, then upgrade to the latest version of Docker Desktop.
Complete the setup for your operating system:
-
Set up Docker for Windows.
After you complete the Docker setup instructions for your operating system, ensure that Kubernetes (not Swarm) is selected as the orchestrator in Docker Preferences.
Use Docker Desktop, where a local Kubernetes environment is pre-installed and enabled. If you do not see the Kubernetes tab, then upgrade to the latest version of Docker Desktop.
Complete the setup for your operating system:
-
Set up Docker for Mac.
After you complete the Docker setup instructions for your operating system, ensure that Kubernetes (not Swarm) is selected as the orchestrator in Docker Preferences.
You will use Minikube as a single-node Kubernetes cluster that runs locally in a virtual machine.
Make sure you have kubectl installed. If you need to install kubectl, see the kubectl installation instructions.
For Minikube installation instructions, see the Minikube documentation.
Getting started
The fastest way to work through this guide is to clone the Git repository and use the projects that are provided inside:
git clone https://github.com/openliberty/guide-sessions.git
cd guide-sessions
The start directory contains the starting project that you will build upon.
The finish directory contains the finished project that you will build.
Before you begin, make sure you have all the necessary prerequisites.
Creating the application
The application that you are working with is a shopping cart web service that uses JAX-RS,
which is a Java API for building RESTful web services.
You’ll learn how to persist a user’s shopping cart data between Open Liberty instances by using the
sessionCache feature. The sessionCache feature persists HTTP
sessions using JCache. You can have high-performance HTTP session persistence
without using a relational database.
Navigate to the start directory to begin.
Create theCartApplicationclass.src/main/java/io/openliberty/guides/cart/CartApplication.java
CartApplication.java
The CartApplication class extends the generic JAX-RS application class that is needed to run the
application.
Create theCartResourceclass.src/main/java/io/openliberty/guides/cart/CartResource.java
CartResource.java
The CartResource class defines the REST endpoints at which a user can make
an HTTP request.
The addToCart and getCart methods
have a number of annotations. Most of these annotations are used by the
MicroProfile OpenAPI and JAX-RS features to document the REST endpoints and map Java objects to web resources.
More information about these annotations can be found in the
Documenting RESTful APIs
and
Creating a RESTful web service
guides.
The cart/{item}&{price} endpoint demonstrates how to set session data.
The @PathParam annotation injects a custom item and
price from the POST request into the method parameter.
The addToCart method gets the current session and binds
the {item}:{price} key-value pair into the session by the setAttribute() method.
A response is then built and returned to confirm that an item was added to your cart and session.
The cart endpoint demonstrates how to get session data.
The getCart method gets the current session, iterates through all key-value
pairs that are stored in the current session, and creates a JsonObject response.
The JsonObject response is returned to confirm the Liberty instance by
pod-name, the session by session-id,
and the items in your cart by cart.
Configuring session persistence
Using client-server vs peer-to-peer model
Session caching is only valuable when a server is connected to at least one other member. There are two different ways session caching can behave in a cluster environment:
-
Client-server model: A Liberty instance can act as the JCache client and connect to a dedicated JCache server.
-
Peer-to-peer model: A Liberty instance can connect with other Liberty instances that are also running with the session cache and configured to be part of the same cluster.
You’ll use the peer-to-peer model in a Kubernetes environment for this guide.
Configuring session persistence with JCache in Open Liberty
JCache, which stands for Java Caching, is an interface
to standardize distributed caching on the Java platform.
The sessionCache feature uses JCache, which allows for session
persistence by providing a common cache of session data between Liberty instances.
This feature doesn’t include a JCache implementation.
For this guide, you’ll use Hazelcast as an open source JCache provider.
Hazelcast is a JCache provider. Open Liberty needs to be configured to use
Hazelcast after the sessionCache feature is enabled.
Create the Libertyserver.xmlconfiguration file.src/main/liberty/config/server.xml
server.xml
pom.xml
The library element includes the library reference that indicates
to the Liberty where the Hazelcast implementation of JCache is located.
Your Hazelcast implementation of JCache is a JAR file that resides in the shared resources directory that is defined by the file element.
The hazelcast-*.jar file is downloaded by the Liberty Maven plugin. The configuration is defined in the provided Maven POM file.
Configuring Hazelcast
server.xml
By default, all Open Liberty instances that run the sessionCache
feature and Hazelcast are connected using a peer-to-peer model.
You can share the session cache only among certain Hazelcast instances
by using the cluster-name configuration element in the Hazelcast configuration file.
Create thehazelcast-config.xmlconfiguration file.src/main/liberty/config/hazelcast-config.xml
hazelcast-config.xml
The CartCluster cluster name is defined in the hazelcast-config.xml file. To allow Hazelcast cluster members to find each other, enable the multicast communication in the network configuration.
In the server.xml configuration file, a reference to the Hazelcast configuration file is made by using
the httpSessionCache tag.
Create thebootstrap.propertiesfile.src/main/liberty/config/bootstrap.properties
bootstrap.properties
1hazelcast.jcache.provider.type=memberHazelcast JCache provides the client and member providers. Set hazelcast.jcache.provider.type to member to use the member provider.
There are more configuration settings that you can explore in the Hazelcast documentation.
Running the application
When you run Open Liberty in dev mode, dev mode listens for file changes and automatically recompiles and deploys your updates whenever you save a new change. Run the following goal to start Open Liberty in dev mode:
WINDOWS
MAC
LINUX
mvnw.cmd liberty:dev./mvnw liberty:dev./mvnw liberty:devAfter you see the following message, your Liberty instance is ready in dev mode:
**************************************************************
*    Liberty is running in dev mode.
Dev mode holds your command-line session to listen for file changes. Open another command-line session to continue, or open the project in your editor.
Point your browser to the http://localhost:9090/openapi/ui/ URL. This URL displays the available REST endpoints.
First, make a POST request to the /cart/{item}&{price} endpoint. To make this request, expand the POST
endpoint on the UI, click the Try it out button, provide an item and a price,
and then click the Execute button.
The POST request adds a user-specified item and price to a session
that represents data in a user’s cart.
Next, make a GET request to the /cart endpoint. To make this request, expand the GET
endpoint on the UI, click the Try it out button,
and then click the Execute button. The GET request
returns a pod name, a session ID, and all the items from your session.
When you are done checking out the service, exit dev mode by pressing CTRL+C in the command-line session where you ran Liberty.
Starting and preparing your cluster for deployment
Start your Kubernetes cluster.
WINDOWS
MAC
LINUX
Start your Docker Desktop environment.
Ensure that Kubernetes is running on Docker Desktop and that the context is set to docker-desktop.
Run the following command from a command-line session:
minikube startNext, validate that you have a healthy Kubernetes environment by running the following command from the active command-line session.
kubectl get nodesThis command should return a Ready status for the master node.
WINDOWS
MAC
LINUX
You do not need to do any other step.
Run the following command to configure the Docker CLI to use Minikube’s Docker daemon. After you run this command, you will be able to interact with Minikube’s Docker daemon and build new images directly to it from your host machine:
eval $(minikube docker-env)Containerizing the application
Before you can deploy the application to Kubernetes, you need to containerize it with Docker.
Make sure to start your Docker daemon before you proceed.
The Dockerfile is provided at the start directory. If you’re unfamiliar with Dockerfile,
check out the Containerizing microservices guide,
which covers Dockerfile in depth.
Run the Maven package goal from the start directory so that the .war file resides in the target directory.
WINDOWS
MAC
LINUX
mvnw.cmd package./mvnw package./mvnw packageTo build and containerize the application, run the following Docker build command in the start directory:
docker build -t cart-app:1.0-SNAPSHOT .When the build finishes, run the following command to list all local Docker images:
docker imagesVerify that the cart-app:1.0-SNAPSHOT image is listed among the Docker images, for example:
REPOSITORY                     TAG
cart-app                       1.0-SNAPSHOT
icr.io/appcafe/open-liberty    kernel-slim-java11-openj9-ubi
Deploying and running the application in Kubernetes
kubernetes.yaml
 1apiVersion: apps/v1
 2kind: Deployment
 3metadata:
 4  name: cart-deployment
 5spec:
 6  selector:
 7    matchLabels:
 8      app: cart
 9  # tag::replicas[]
10  replicas: 3
11  # end::replicas[]
12  template:
13    metadata:
14      labels:
15        app: cart
16    spec:
17      containers:
18      - name: cart-container
19        image: cart-app:1.0-SNAPSHOT
20        ports:
21        - name: http
22          containerPort: 9090
23        - name: hazelcast
24          containerPort: 5701
25---
26apiVersion: v1
27kind: Service
28metadata:
29  name: cart-service
30spec:
31  type: NodePort
32  selector:
33    app: cart
34  ports:
35  - protocol: TCP
36    port: 9090
37    targetPort: 9090
38    nodePort: 31000
Now that the containerized application is built, deploy it to a local Kubernetes cluster by using
a Kubernetes resource definition, which is provided in the kubernetes.yaml file
at the start directory.
First, use the ClusterRoleBinding Kubernetes API object to grant Hazelcast members to access the cluster.
kubectl apply -f https://raw.githubusercontent.com/hazelcast/hazelcast/master/kubernetes-rbac.yamlRun the following command to deploy the application into 3 replicated pods as defined
in the kubernetes.yaml file:
kubectl apply -f kubernetes.yamlWhen the application is deployed, run the following command to check the status of your pods:
kubectl get podsYou see an output similar to the following if all the pods are working correctly:
NAME                             READY  STATUS   RESTARTS  AGE
cart-deployment-98f4ff789-2xlhs  1/1    Running  0         17s
cart-deployment-98f4ff789-6rvfj  1/1    Running  0         17s
cart-deployment-98f4ff789-qrh45  1/1    Running  0         17s
WINDOWS
MAC
LINUX
Point your browser to the http://localhost:31000/openapi/ui/ URL. This URL displays the available REST endpoints.
Run the minikube ip command to get the hostname for minikube.
Then, go to the http://[hostname]:31000/openapi/ui/ URL in your browser.
This URL displays the available REST endpoints.
Make a POST request to the /cart/{item}&{price} endpoint. To make this request, expand the POST
endpoint on the UI, click the Try it out button, provide an item and a price,
and then click the Execute button.
The POST request adds a user-specified item and price to a session
that represents data in a user’s cart.
Next, make a GET request to the /cart endpoint. To make this request, expand the GET
endpoint on the UI, click the Try it out button, and then click the Execute button.
The GET request returns a pod name, a session ID, and all the items from your session.
{
  "pod-name": "cart-deployment-98f4ff789-2xlhs",
  "session-id": "RyJKzmka6Yc-ZCMzEA8-uPq",
  "cart": [
    "eggs | $2.89"
  ],
  "subtotal": 2.89
}
Replace the [pod-name] in the following command, and then run the command to pause
the pod for the GET request that you just ran:
kubectl exec -it [pod-name] -- /opt/ol/wlp/bin/server pauseRepeat the GET request. You see the same session-id
but a different pod-name because the session data is cached but the request
is served by a different pod (Liberty instance).
Verify that the Hazelcast cluster is running by checking the Open Liberty log. To check the log, run the following command:
kubectl exec -it [pod-name] -- cat /logs/messages.logYou see a message similar to the following:
... [10.1.0.46]:5701 [CartCluster] [5.3.0]

Members {size:3, ver:3} [
	Member [10.1.0.40]:5701 - 01227d80-501e-4789-ae9d-6fb348d794ea
	Member [10.1.0.41]:5701 - a68d0ed1-f50e-4a4c-82b0-389f356b8c73 this
	Member [10.1.0.42]:5701 - b0dfa05a-c110-45ed-9424-adb1b2896a3d
]
You can resume the paused pod by running the following command:
kubectl exec -it [pod-name] -- /opt/ol/wlp/bin/server resumeTearing down the environment
When you no longer need your deployed application, you can delete all Kubernetes resources and disable the Hazelcast members' access to the cluster by running the kubectl delete commands:
kubectl delete -f kubernetes.yaml
kubectl delete -f https://raw.githubusercontent.com/hazelcast/hazelcast/master/kubernetes-rbac.yaml
WINDOWS
MAC
LINUX
Nothing more needs to be done for Docker Desktop.
Perform the following steps to return your environment to a clean state.
-
Point the Docker daemon back to your local machine:
eval $(minikube docker-env -u) -
Stop your Minikube cluster:
minikube stop -
Delete your cluster:
minikube delete
Great work! You’re done!
You have created, used, and cached HTTP session data for an application that was running on Open Liberty and deployed in a Kubernetes cluster.
Guide Attribution
Caching HTTP session data using JCache and Hazelcast by Open Liberty is licensed under CC BY-ND 4.0

Copied to clipboard
Prerequisites:
Great work! You're done!
What did you think of this guide?


Thank you for your feedback!
What could make this guide better?
Raise an issue to share feedback
Create a pull request to contribute to this guide
Need help?
Ask a question on Stack Overflow


