Run a MicroProfile application as a serverless function with CloudEvents in IBM Cloud Code Engine


Serverless applications, which can scale to zero and allocate resources on demand, are certainly a hot topic in 2022. With MicroProfile widely adopted by cloud native applications, many developers want to know:
Can MicroProfile applications be serverless?
The short answer is YES. This post demonstrates how to run a MicroProfile application on Open Liberty as a serverless function in IBM Cloud Code Engine.
What is serverless?
Serverless is short for serverless computing, which is an execution model in which the cloud provider allocates resources on demand. Serverless enables you to concentrate on your applications without needing to manage servers. It does not mean no server is running in the background. On the contrary, serverless architecture contains servers.
Serverless normally executes code in the form of a function and is sometimes referred to Function as a Service (FaaS) or Container as a Service (CaaS). A few major cloud providers support serverless applications:
-
IBM Cloud Code Engine: IBM Cloud Function
-
AWS: AWS Lambda
-
Microsoft Azure: Azure Functions
-
Google Cloud: Google Cloud Functions
This post uses the following specifications and frameworks to create and run a serverless application.
- CloudEvents
-
CloudEvents is a specification to describe event data in a common language-agnostic way. CloudEvents simplifies event declaration and delivery across services and platforms. This specification is under the Cloud Native Computing Foundation (CNCF). CloudEvents are supported by many serverless frameworks, including IBM Cloud Code Engine.
- IBM Cloud Code Engine
-
IBM Cloud Code Engine (ICCE) is a fully managed, serverless platform designed to run container images, batch jobs, or source code. Code Engine allows you to build event-driven workloads that react to CloudEvents. Code Engine is truly serverless. It automatically scales your workloads up and down, even down to zero when there are no requests. You pay for only the resources you consume. You can easily run your cloud native applications in Code Engine.
- MicroProfile
-
Many developers use MicroProfile specifications for configuring, securing, and observing cloud native applications. MicroProfile offers a set of standard APIs for cloud-native applications that free your applications from vendor lock-in. Open Liberty is the leading implementation for MicroProfile specifications.
As we enter the serverless era, it is very important to get MicroProfile applications running in a serverless environment. Luckily, it is very straightforward to get these applications running as functions in an environment that supports CloudEvents, such as IBM Cloud Code Engine. In the following sections, we demonstrate how to get a MicroProfile application that is deployed to Open Liberty running as a function in IBM Cloud Code Engine with CloudEvents.
Run MicroProfile applications as a serverless function in Code Engine
RESTful MicroProfile applications can run seamlessly as a serverless function in Code Engine with CloudEvent. This section explains how.
Prerequisites
Before you start, you will need the following prerequisites:
-
An IBM Cloud Account
-
An externally accessible container registry that can host your images. This post focuses on IBM Cloud Container Registry, which is available as part of your IBM Cloud account.
Create your MicroProfile application
In this post, we use the OpenLiberty Getting Started guide to get a simple MicroProfile application that is well suited to run in a serverless environment.
If you already have experience with OpenLiberty and MicroProfile, you can use the application files in the finish folder of the Getting Started Guide as your starting point and go to the next step. If you are new to Open Liberty, complete the guide up to and including the Running the application in a Docker container step to generate the application you’ll use in this post.
After you have the application, the next step is to test it to ensure that it is running and accessible.
Run the following command to run your container locally on its HTTP port:
docker run -p 9080:9080 openliberty-getting-started:1.0-SNAPSHOTRun the following curl command to invoke the application and confirm that it is accessible:
curl http://localhost:9080/dev/system/propertiesThis command invokes the getProperties() method in the application’s SystemResource class.
Deploy your application to IBM Cloud Container Registry to prepare for IBM Cloud Code Engine
After you successfully build and test your image locally, you now need to put it somewhere that ICCE can get to it.
With ICCE, you can get your code into a runnable format either by using a source code respository, such as GitHub, or an externally accessible container registry, such as a public registry (eg. DockerHub), IBM Cloud Container Registry, or a private registry.
Since you already have a IBM Cloud account, this post focuses on IBM Cloud Container Registry (ICCR), which provides the quickest route to getting your image up and running. Log in to your IBM Cloud account and follow these steps to upload your image.
Create your IBM Cloud Code Engine application
With your image uploaded, you now need to create and configure your ICCE application to make your function available.
Follow these steps to create your IBM Cloud Code Engine application from your image in ICCR.
When you create your application, consider the following options:
- Image reference
-
While the name of your image will stay the same, you will be updating it later. Consider whether to use the image hash that is within the registry or the tag you uploaded with that. Be aware that an update to the image may not be reflected when executed in ICCE if it uses the old tag.
- Resource allocation
-
As part of the application definition, you can tell ICCE how much CPU and Memory to allocate to any running instances. While the application is small, it is still a Java application that needs a period of startup before it can start serving requests. The Getting Started image will eventually start on the minimum values, but giving it slightly more will significantly improve startup and response time.
- Listening port
-
Use port 9080 as the value for the listening port. For more information, see Considerations for HTTP handling.
After you create your application, ensure that it is not showing any errors such as Missing Pull credentials, which indicates that the image cannot be pulled to run. If you have any of these errors, follow the steps in the ICCE documentation to resolve. Some errors might occur only when the application is invoked for the first time.
Invoke your application on IBM Cloud Code Engine
Now that you have the application, you can invoke it within ICCE.
As part of creating your application on ICCE, you obtained the application URL from the test application or the command line. If you did not get the URL, follow these steps to get it.
All ICCE connections are HTTPS. So while HTTP was used locally, the image is configured to support HTTPS without any changes.
If you make a request to https://{ICCE_Application_URL}/, you should see the Welcome to Open Liberty page.
To call the application on ICCE, we can use the same path that we used for the application locally. Run the following curl command:
curl https://${ICCE_Application_URL}/dev/system/propertiesSimilar to the local call that you made previously, after a short time, you get a JSON payload that contains all the system properties.
Congratulations! You just called your application on IBM Cloud Code Engine.
Update the MicroProfile application to use CloudEvents
A common use case for serverless applications is to process events coming from non-HTTP sources, such as Kafka topics or object stores. Historically, to consume these events, the application had to use the Cloud provider’s SDK, which locks the application into that provider. This is where CloudEvents comes in. It provides a cross-provider standard around which applications can transmit and receive data, improving portability and reducing large dependencies.
ICCE connects event providers such as IBM Cloud Event Streams or IBM Cloud Object Storage to the application by using CloudEvents. These events are sent to a subscribed application as HTTP POST requests. Because the requests are in HTTP format, a RESTful application can receive these events without needing additional libraries and configuration.
To be able to process CloudEvents in Open Liberty, add the CloudEvents restful-ws-jakarta library to the application by adding the following dependency to your pom.xml:
<dependency>
    <groupId>io.cloudevents</groupId>
    <artifactId>cloudevents-http-restful-ws-jakarta</artifactId>
    <version>2.5.0</version>
</dependency>
When you run the CloudEventsProvider class within the context of Open Liberty, it is automatically configured to marshal and unmarshal CloudEvents.
With the library included, you can now update the SystemResource class from the Getting Started guide application to use CloudEvents.
Review the completed CloudEvents SystemResource class
Before you update the SystemResource class, take a moment to review the the completed CloudEvents SystemResource class, which contains all the code changes you will implement in the following sections. You can refer back to this example to check that changes you make align with the expected result.
Once complete, the SystemResource class should look very similar to this:
// tag::copyright[]
/*******************************************************************************
 * Copyright (c) 2017, 2022 IBM Corporation and others.
 * All rights reserved. This program and the accompanying materials
 * are made available under the terms of the Eclipse Public License v1.0
 * which accompanies this distribution, and is available at
 * http://www.eclipse.org/legal/epl-v10.html
 *
 * Contributors:
 *     IBM Corporation - Initial implementation
 *******************************************************************************/
// end::copyright[]
package io.openliberty.sample.system;

import io.cloudevents.CloudEvent;
import io.cloudevents.CloudEventData;
import io.cloudevents.core.builder.CloudEventBuilder;
import jakarta.json.bind.Jsonb;
import jakarta.json.bind.JsonbBuilder;
import jakarta.ws.rs.POST;

import jakarta.enterprise.context.RequestScoped;
import jakarta.ws.rs.GET;
import jakarta.ws.rs.Path;
import jakarta.ws.rs.Produces;
import jakarta.ws.rs.core.MediaType;

import org.eclipse.microprofile.metrics.annotation.Counted;
import org.eclipse.microprofile.metrics.annotation.Timed;

import java.net.URI;
import java.nio.charset.StandardCharsets;
import java.util.ArrayList;
import java.util.HashMap;
import java.util.Map;

@RequestScoped
@Path("/properties")
public class SystemResource {

    @GET
    @Produces(MediaType.APPLICATION_JSON)
    @Timed(name = "getPropertiesTime",
           description = "Time needed to get the JVM system properties")
    @Counted(absolute = true, description
             = "Number of times the JVM system properties are requested")
    public CloudEvent getProperties() {
        /* java.util.properties does not have a direct way to obtain a byte[] so store in an intermedietary Map first*/
        Map properties = System.getProperties();
        Jsonb jsonb = JsonbBuilder.create();
        /* convert properties map into a JSON string which can then be converted into a byte[]*/
        String jsonString = jsonb.toJson(properties);
        return CloudEventBuilder.v1()
                .withData(jsonString.getBytes())
                .withDataContentType("application/json")
                .withId("properties")
                .withType("java.properties")
                .withSource(URI.create("http://system.poperties"))
                .build();
    }

    @POST
    @Produces(MediaType.APPLICATION_JSON)
    @Timed(name = "queryPropertiesTime",
            description = "Time needed to query the JVM system properties")
    @Counted(absolute = true, description
            = "Number of times the JVM system properties are queried")
    public CloudEvent queryProperties(CloudEvent query){
        Map properties = System.getProperties();
        HashMap<String,String> props = new HashMap<>((Map<String,String>)properties);
        HashMap<String,String> qProps = new HashMap<String,String>();
        Jsonb jsonb = JsonbBuilder.create();

        /* Pull data from the data portion of the CloudEvent - this is in binary format so convert it into a standard String*/
        CloudEventData data = query.getData();
        String jsonString = new String(data.toBytes(), StandardCharsets.UTF_8);

        /* Take the Json Array data and use that to pull out the request properties */
        ArrayList<String> tProps = jsonb.fromJson(jsonString, ArrayList.class);
        for(String key: tProps){
            qProps.put(key, props.get(key));
        }

        /* return a CloudEvent with our queried properties */
        return CloudEventBuilder.v1()
                .withData(jsonb.toJson(qProps).getBytes())
                .withDataContentType("application/json")
                .withId("properties")
                .withType("java.properties")
                .withSource(URI.create("http://system.poperties"))
                .build();
    }

}
Return a CloudEvent
First, update the SystemResource class response Type from Response to CloudEvent. In the method declaration, replace Response with CloudEvent:
public CloudEvent getProperties() {Now, we need to construct a CloudEvent to return. However, first we need to do some work on the system properties to be able to include them as the data within the event.
CloudEvents cannot convert the data from Object to byte[] and requires the data to be in a binary format when it is provided during its building process. As such, we can take the properties from System.getProperties() and make them into a JSON string by using Jsonb.
/* java.util.properties does not have a direct way to obtain a byte[] so store in an intermediary Map first*/
    Map properties = System.getProperties();
    Jsonb jsonb = JsonbBuilder.create();
/* convert properties map into a JSON string which can then be converted into a byte[]*/
    String jsonString = jsonb.toJson(properties);
With our data in string format, we can now get the byte[] representation of the data.
The CloudEventBuilder class provides the necessary components to build our CloudEvent. Use the most recent specification version, which is v1().
    return CloudEventBuilder.v1()
        .withData(jsonString.getBytes())
        .withDataContentType("application/json")
        .withId("properties")
        .withType("java.properties")
        .withSource(URI.create("http://system.poperties"))
        .build();
Besides withData(), the rest of the methods set the values that will be returned as headers in the response.
Once all the required properties are set, you can build the CloudEvent Object.
This sample provides only the required properties for a valid CloudEvent. If any of these properties are missing, an exception is thrown. To see which properties are required, you can review the specification.
Because CloudEvents can come from a wide variety of sources that might differ even within a single provider, the majority of the fields are fairly free-form.
Receive a CloudEvent
Now that we’ve returned a CloudEvent, how can we receive one in the application?
First, we’ll enhance the SystemResource class to add a query method that can send a POST request with a body that contains the system properties that we want returned.
The body of the request will be a JSON array that contains each property we want returned as part of the request.
["java.vendor.url","awt.toolkit"]Add the following method declaration to the SystemResource class.
    @POST
    @Produces(MediaType.APPLICATION_JSON)
    @Timed(name = "queryPropertiesTime",
            description = "Time needed to query the JVM system properties")
    @Counted(absolute = true, description
            = "Number of times the JVM system properties are queried")
    public CloudEvent queryProperties(CloudEvent query){


}
In this case, we will return a CloudEvent, but you can return any type that confirms the request was received, such as Response.ok().build();.
Inside the method, we need to do some of the same things that we did within the getProperties() method. But we also must handle the CloudEvent input.
For some initial structure, add this block to the top of the method.
Map properties = System.getProperties();
HashMap<String,String> props = new HashMap<>((Map<String,String>)properties);
HashMap<String,String> qProps = new HashMap<String,String>();
Jsonb jsonb = JsonbBuilder.create();
This block gives us the Map of the properties, but in a form that is more useful, as we need to do more processing than we did within the getProperties() method.
To retrieve the data from the CloudEvent, we use .withData(); to extract the payload as an instance of CloudEventData. The data is in binary format, so needs to be converted to make it usable.
/* Pull data from the data portion of the CloudEvent - this is in binary format so convert it into a standard String*/
CloudEventData data = query.getData();
String jsonString = new String(data.toBytes(), StandardCharsets.UTF_8);
The conversion to a String allows us to process the JSON payload later. You can check what data type has been by inspecting the Data Content Type from getDataContentType() on the CloudEvent.
With the data now in a more usable format, we can start to process it and make use of its contents.
Because we have a JSON array, we can use jsonb to convert the JSON to an ArrayList of the keys that are requested from the properties HashMap.
/* Take the Json Array data and use that to pull out the request properties */
ArrayList<String> tProps = jsonb.fromJson(jsonString, ArrayList.class);
for(String key: tProps){
    qProps.put(key, props.get(key));
}
We use the other hashmap created at the start to store the properties we queried for.
Now that we have built our map of queried properties, it can be returned to the user in the same way we returned the full list of properties.
return CloudEventBuilder.v1()
    .withData(jsonb.toJson(qProps).getBytes())
    .withDataContentType("application/json")
    .withId("properties")
    .withType("java.properties")
    .withSource(URI.create("http://system.poperties"))
    .build();
Next, we’re ready to test the new method.
To invoke the method, we make a POST request against /dev/system/properties with the HTTP request being a CloudEvent. You can do this locally, or against a rebuilt Docker image.
To invoke this method, use the following curl command:
curl -X POST http://${ICCE_Application_URL}/dev/system/properties \
-H "Ce-Specversion: 1.0" \
-H "Ce-Type: properties" \
-H "Ce-Source: io.cloudevents.examples/properties" \
-H "Ce-Id: 536808d3-88be-4077-9d7a-a3f162705f78" \
-H "Content-Type: application/json" \
-H "Ce-Subject: resources" \
-d "[\"java.vendor.url\",\"awt.toolkit\"]"
In the same way that we returned a CloudEvent, when we make the request, we need to provide the required set of headers so that the application can correctly convert the request into a CloudEvent.
Update your ICCE application to use the serverless function
The application can now return and receive CloudEvents. We can update our application in ICCE.
To update your application, complete the following steps:
-
Rebuild your Liberty application with the CloudEvent changes.
-
Rebuild your docker container and publish to it ICCR, either by updating the image tag or leaving it as is if you are using the image hash.
-
Update your ICCE application to use the new application version.
After you update your application, you can validate your changes in ICCE by invoking the same curl commands that we used locally, but replacing the protocol and hostname.
curl -X POST https://${ICCE_Application_URL}/dev/system/properties \
-H "Ce-Specversion: 1.0" \
-H "Ce-Type: properties" \
-H "Ce-Source: io.cloudevents.examples/properties" \
-H "Ce-Id: 536808d3-88be-4077-9d7a-a3f162705f78" \
-H "Content-Type: application/json" \
-H "Ce-Subject: resources" \
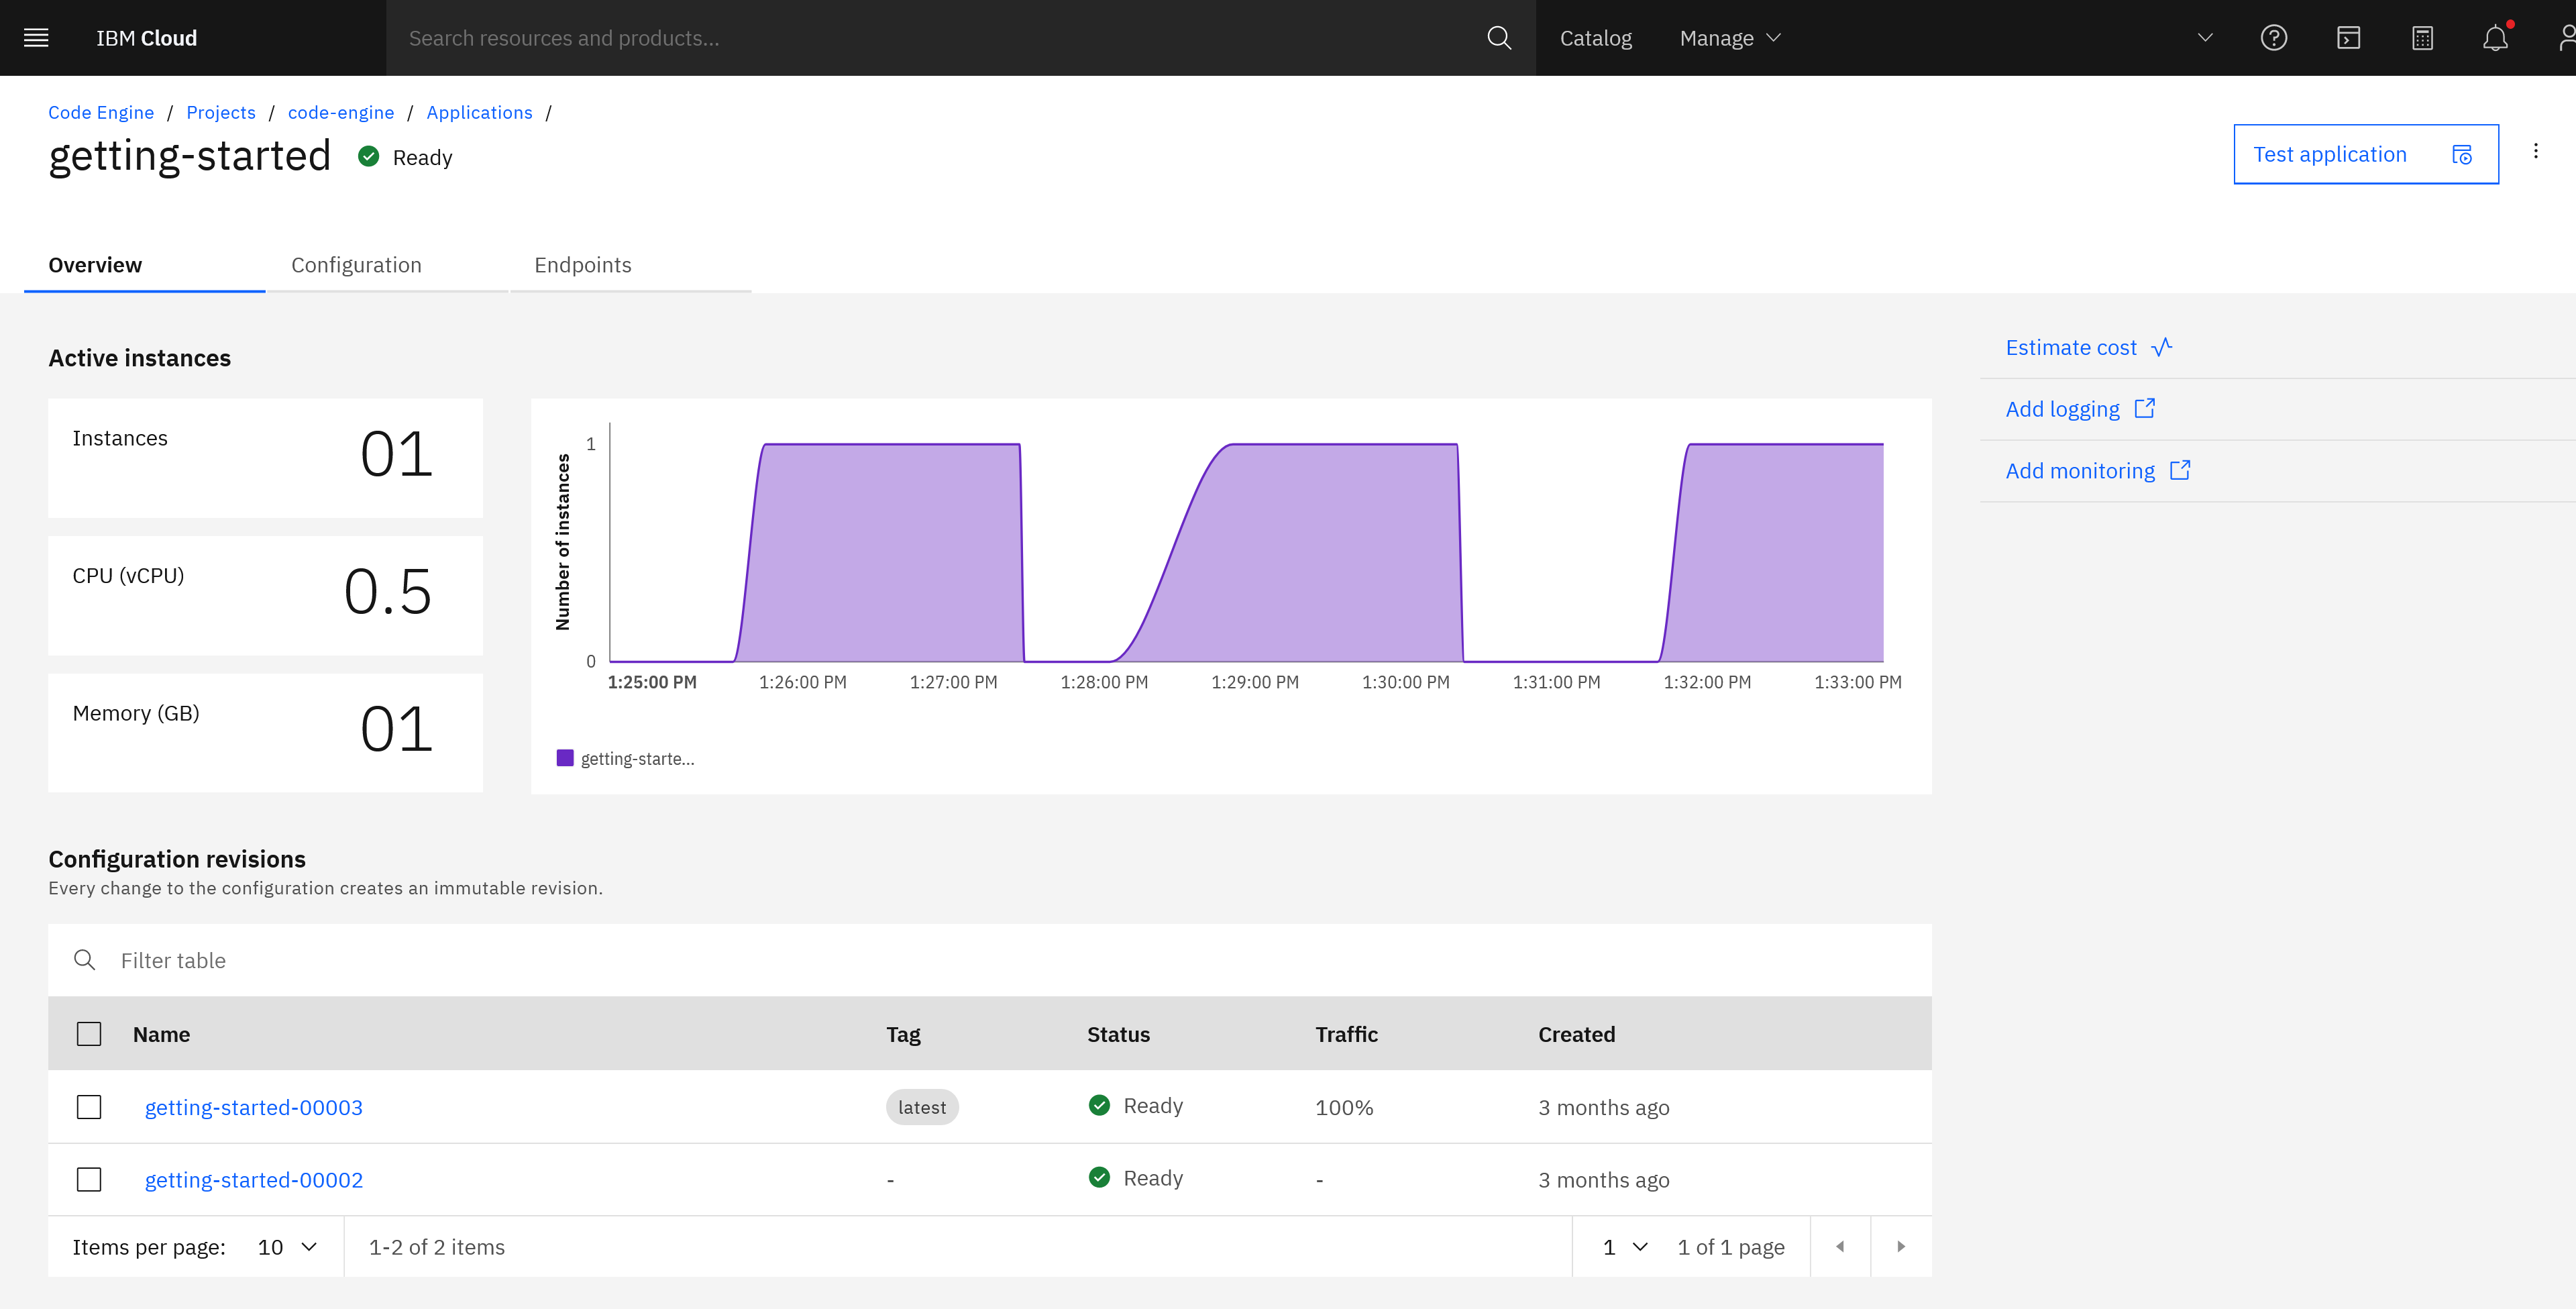
-d "[\"java.vendor.url\",\"awt.toolkit\"]"If you open the IBM Cloud Code Engine UI to the Overview tab for your application, you can see the active instances while you are making requests. You can observe IBM Cloud Code Engine deploying the application instance and then scaling down to zero when no new requests are received.
You now have a MicroProfile application on Open Liberty running as a serverless function in IBM Cloud Code Engine with CloudEvents!


