Easy integration testing for Java EE and MicroProfile applications with Testcontainers

Have you ever toiled with creating mock objects for unit tests? How about custom setup steps for integration tests? Ever had an issue in production because of differences in behavior between testing and production environments?
If you answered yes to any of these questions, answer one more for me: do your applications run in Docker containers?
One of the great benefits of Docker is that we get a nice consistent package that contains everything down to the OS, meaning it’s portable to any hardware. Great, so lets use this to get consistent testing environments too!
Introducing Testcontainers
Testcontainers is a great open source library that essentially wraps Docker in a Java API, and has first-class integration with JUnit. It is mainly used for external resource dependencies, and has first-class support for many popular databases such as Postgres and MySQL. However, one of the most important features is generic support for any Docker image.
Using the GenericContainer API, we can get a running Liberty server for our integration tests in no time, with no special setup required.
For example, take this JUnit test class:
import org.testcontainers.containers.GenericContainer;

public class SampleTest {

    @ClassRule
    public static GenericContainer libertyContainer = new GenericContainer("open-liberty:microProfile2")
                                                              .withExposedPorts(9080);

    // < some JUnit @Test methods >
}
In the SampleTest class above:
-
The String parameter
"open-liberty:microProfile2"is the name of the Docker image to use. -
JUnit’s
@ClassRuleon any Testcontainer container object results in the container being started before any@Testmethods run, and then stopped after all tests are done running. -
Using
withExposedPorts(9080)exposes the container’s 9080 port (Liberty’s default HTTP port) to our JUnit process.
To start using Testcontainers, simply add a test-scoped maven dependency:
<dependency>
    <groupId>org.testcontainers</groupId>
    <artifactId>testcontainers</artifactId>
    <version>1.11.0</version>
    <scope>test</scope>
</dependency>
Also, if you don’t already have Docker installed on your machine, you will need to do so.
Follow along!
All of the code in this blog post is available on Github. Simply clone the repo and follow the steps in the README to run it locally.
Testing my application’s container
Being able to start a Liberty container easily from a JUnit test is ok, but we need to get our test application in the container too. Since I am already putting my application in a Docker container, I have this Dockerfile on-hand already.
FROM open-liberty:microProfile2
ADD build/libs/myservice.war /config/dropins
COPY src/main/liberty/config /config/
Also, I’m already using some sort of Maven or Gradle plugin to package (and possibly run) my app’s container. In my case, I use the com.avast.gradle.Docker-compose Gradle plugin to build a Docker image locally. Using this Gradle plugin, I can simply invoke ./gradlew composeBuild and it will build a Docker container with everything needed to run my app in it. Likewise, I can do ./gradlew composeUp to run my Docker container locally.
Suppose the above Dockerfile creates an image named my-service when built. Using that image, we can easily test it using a GenericContainer:
import org.testcontainers.containers.output.Slf4jLogConsumer;

public class SampleTest {

    static final Logger LOGGER = LoggerFactory.getLogger(SampleTest.class);

    @ClassRule
    public static GenericContainer libertyContainer = new GenericContainer("my-service")
                    .waitingFor(Wait.forHttp("/myservice"))
                    .withExposedPorts(9080)
                    .withLogConsumer(new Slf4jLogConsumer(LOGGER));

    @Test
    public void pingApp() {
        URL appURL = "http://" + libertyContainer.getContainerIpAddress() + ':' +
                            libertyContainer.getFirstMappedPort() +
                            "/myservice";
        // programmtically invoke HTTP request and read response (don't worry -- we will simplify this next)
    }
}
Waiting for container readiness before starting tests
Containers take a varying amount of time to be ready. By default, Testcontainers will wait for the first mapped network port to be ready. However, for application servers the HTTP port may be available before the app is, so we want to wait for the app’s endpoint to be available before we start running tests. To accomplish this we use waitingFor(Wait.forHttp("/myservice")), which will wait for http://<container_ip>:<container_port>/myservice to return HTTP 200 before allowing any tests to run. There are many different ways to customize container readiness checks. Refer to the official Testcontainers documentation on this topic for full details.
Port assignment
It’s worth pointing out that when we call GenericContainer.withExposedPorts(port), we are exposing ports from the perspective of the container. From the perspective of the test client (i.e. where the pingApp() test method runs), the Liberty container will be running on a random port. Testcontainers will randomly assign a free port on the host network, so that you don’t ever need to worry about port conflicts.
Logs!
Tests are going to fail at some point, and when that happens you want to be able to rely on logs generated during the test to debug the failure. Using Testcontainers built-in Slf4jLogConsumer, we can pipe all of the container output to the JUnit process so we have a single set of logs to look at. This is extremely handy when writing new tests or debugging a test failure. If you want to keep the logs separated, that’s also possible by using standard logging configuration (e.g. log4.properties).
Simple HTTP invocations with a type-safe REST client and JSON-B
At this point we can easily start our app in a container as part of the test life cycle. Now we need a good way to drive HTTP test requests on it. This is where a lot of other testing frameworks fall short in my opinion, but with a few test-side dependencies we can really smooth this out.
Let’s assume we want to test the following basic CRUD JAX-RS endpoint that manages data about people and uses the JSON format to serialize data.
The data model for a person might look like this:
public class Person {

    private static final Random r = new Random();

    public final long id;
    public final String name;
    public final int age;

    public Person(String name, int age) {
        this(name, age, null);
    }

    @JsonbCreator
    public Person(@JsonbProperty("name") String name,
                  @JsonbProperty("age") int age,
                  @JsonbProperty("id") Long id) {
        this.name = name;
        this.age = age;
        this.id = id == null ? r.nextLong() : id;
    }

}
and the JAX-RS endpoint might look like this:
@Path("/")
@ApplicationScoped
@Produces(MediaType.APPLICATION_JSON)
@Consumes(MediaType.APPLICATION_JSON)
public class PersonService {

    @GET
    public Collection<Person> getAllPeople() { /* ... */ }

    @GET
    @Path("/{personId}")
    public Person getPerson(@PathParam("personId") long id) { /* ... */ }

    @POST
    public Long createPerson(@QueryParam("name") @NotEmpty @Size(min = 2, max = 50) String name,
                             @QueryParam("age") @PositiveOrZero int age) { /* ... */ }

    @PATCH
    @Path("/{personId}")
    public void updatePerson(@PathParam("personId") long id, @Valid Person p) { /* ... */ }

    @DELETE
    @Path("/{personId}")
    public void removePerson(@PathParam("personId") long id) { /* ... */ }
}
Leveraging application classes to simplify test client invocations
If we have the application classes under test on the test client’s classpath, we can do two interesting things:
-
Build a type-safe REST client for invoking operations on
PersonService -
Use JSON-B to automatically convert between
Personobjects and JSON data
This is made possible by the following test-only dependencies:
dependencies {
  // JSON-B
  testCompile group: 'org.eclipse', name: 'yasson', version: '1.0.3'
  testCompile group: 'org.glassfish', name: 'javax.json', version: '1.1.4'
  // Type-safe REST client
  testCompile group: 'org.apache.cxf', name: 'cxf-rt-rs-client', version: '3.3.0'
  testCompile group: 'cglib', name: 'cglib-nodep', version: '3.2.10'
}
With these test dependencies, we can create and use a type-safe rest client like this:
@ClassRule
public static GenericContainer libertyContainer = new GenericContainer("my-service")
                    .withExposedPorts(9080)
                    .withLogConsumer(new Slf4jLogConsumer(LOGGER))
                    .waitingFor(Wait.forHttp("/myservice"));

private static PersonService personSvc;

@BeforeClass
public static void setupClass() {
    List<Class<?>> providers = new ArrayList<>();
    providers.add(MyJsonBProvider.class); // trivial implementation of a JAX-RS MessageBodyReader/Writer
    String appPath = "http://" + libertyContainer.getContainerIpAddress() + ':' +
                                 libertyContainer.getFirstMappedPort() +
                                 "/myservice"
    personSvc = JAXRSClientFactory.create(appPath, PersonService.class, providers);
}

@Test
public void testGetPerson() {
    // invokes HTTP POST on http://<my-service-ip>:<my-service-port>/myservice/
    // with query params name="Bob" age=24 (as defined on PersonService.createPerson())
    Long bobId = personSvc.createPerson("Bob", 24);
    // returns a generated ID

    // invokes HTTP GET http://<my-service-ip>:<my-service-port>/myservice/{bobID}
    // JSON response is automatically deserlialized into Person object
    Person bob = personSvc.getPerson(bobId);

    // Now that we have a POJO representing the response, verify data with simple JUnit assertions
    assertEquals("Bob", bob.name);
    assertEquals(24, bob.age);
    assertNotNull(bob.id);
}
Adding in a real database
Chances are that in production we would want our PersonService to be persisting information into some sort of database. With Testcontainers we can easily create a database instance for our app to communicate with. In this case I’ll use MongoDB, which does not have a first-class integration with Testcontainers, but is still easy to use as a GenericContainer.
To accomplish this, we can start by adding another container for MongoDB:
@ClassRule
public static GenericContainer mongodb = new GenericContainer("mongo:3.4");
With this setup, the test client can communicate with the MongoDB container and the Liberty container. However, the MongoDB and Liberty containers cannot communicate with each other, since they are in isolated networks.
Linking two or more containers
By default, each container gets an isolated network. If our containers need to communicate with each other we can enlist them in a Testcontainer Network to establish communication between the two or more containers.
The network can be visualized as follows:
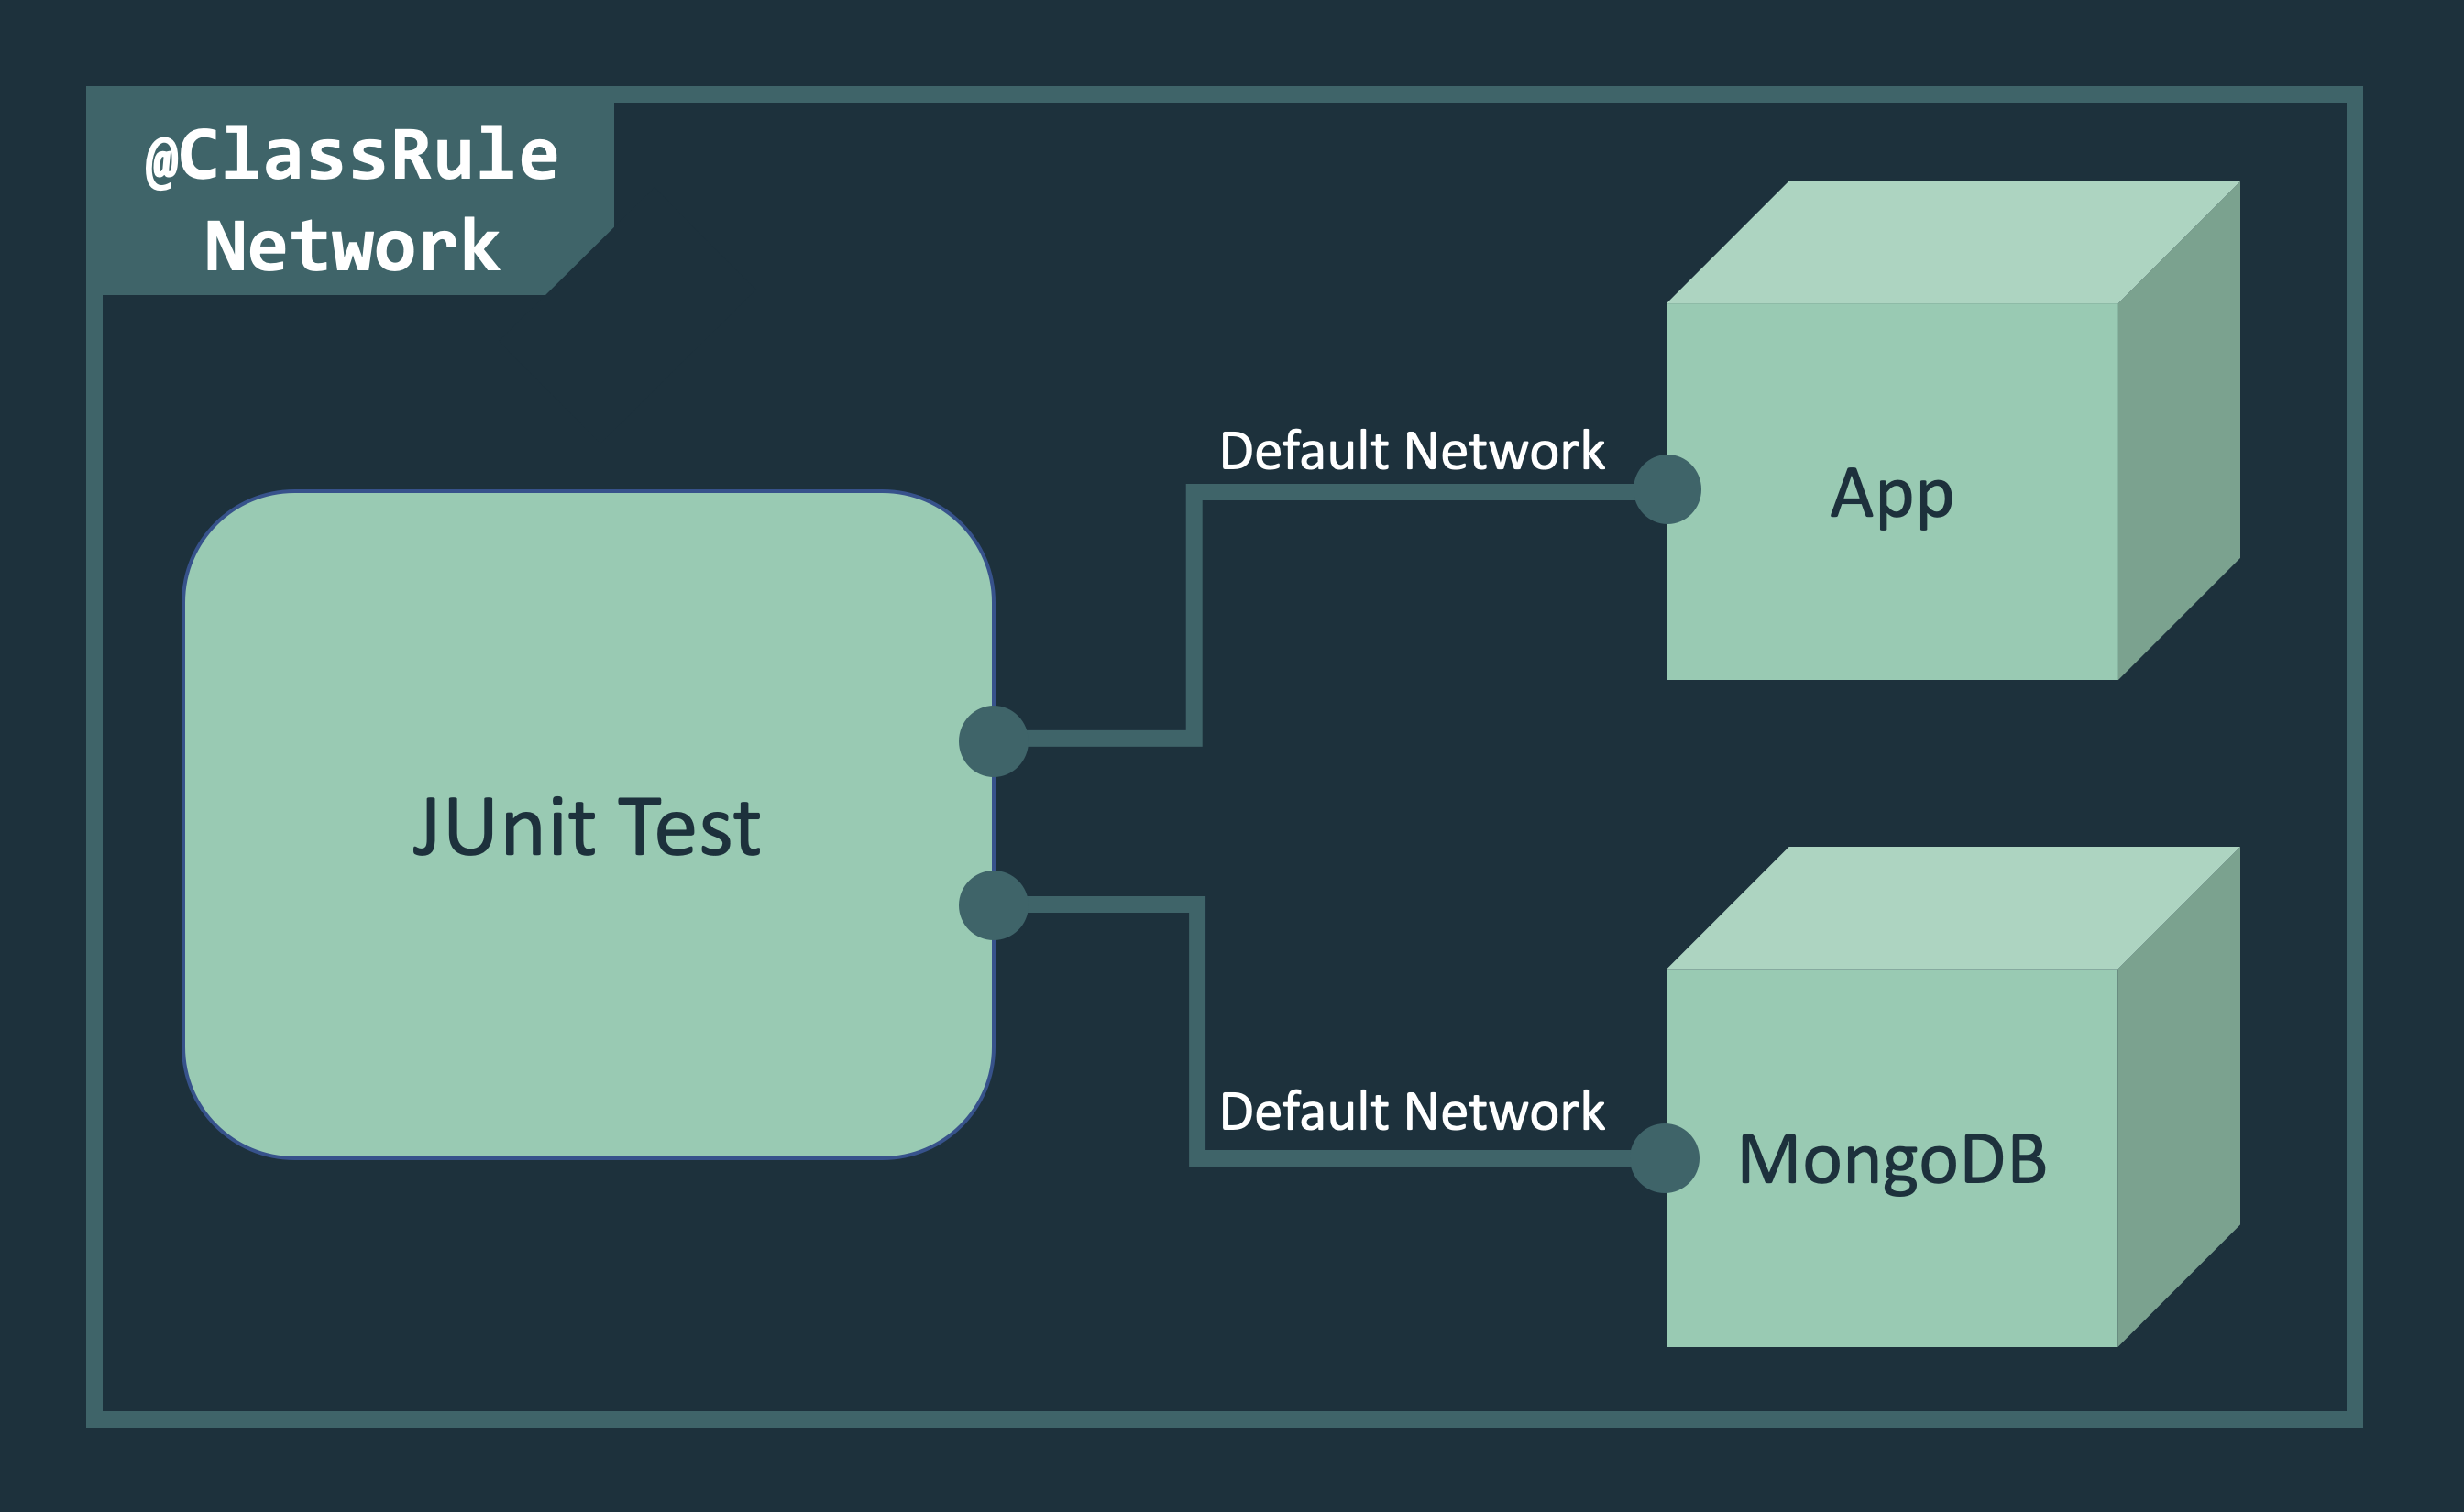
@ClassRule
public static Network network = Network.newNetwork();

@ClassRule
public static GenericContainer mongodb = new GenericContainer("mongo:3.4")
                // ...
                .withNetwork(network)
                .withNetworkAliases("testmongo");

@ClassRule
public static GenericContainer libertyContainer = new GenericContainer("my-service")
                // ...
                .withNetwork(network)
                .withEnv("MONGO_HOSTNAME", "testmongo")
                .withEnv("MONGO_PORT", "27017");
We can also set environment variables on a GenericContainer — exactly as you would do in production with your containers. In this case, the application reads the MONGO_HOSTNAME and MONGO_PORT environment variables (using MicroProfile Config) to configure the MongoDB client.
Putting it all together
Even though Testcontainers was originally intended for setting up external resources, I have found it to be extremely useful for testing my application’s code in a Docker container as well. Especially if you are already packaging your application into a Docker container, writing integration tests with this approach is very simple, and can be done in pure Java.
Once we have the container rules set up in our test class, we can write lots of simple JUnit tests that invoke HTTP requests on the Docker container:
@Test
public void testGetPerson() {
    Long bobId = personSvc.createPerson("Bob", 24);
    Person bob = personSvc.getPerson(bobId);
    assertEquals("Bob", bob.name);
    assertEquals(24, bob.age);
    assertNotNull(bob.id);
}

@Test
public void testGetAllPeople() {
    Long person1Id = personSvc.createPerson("Person1", 1);
    Long person2Id = personSvc.createPerson("Person2", 2);

    Person expected1 = new Person("Person1", 1, person1Id);
    Person expected2 = new Person("Person2", 2, person2Id);

    Collection<Person> allPeople = personSvc.getAllPeople();
    assertTrue("Expected at least 2 people to be registered, but there were only: " + allPeople,
               allPeople.size() >= 2);
    assertTrue("Did not find person " + expected1 + " in all people: " + allPeople,
               allPeople.contains(expected1));
    assertTrue("Did not find person " + expected2 + " in all people: " + allPeople,
               allPeople.contains(expected2));
}

// HTTP error code responses automatically get mapped to Exceptions with the type-safe rest client
@Test(expected = NotFoundException.class)
public void testGetUnknownPerson() {
    personSvc.getPerson(-1L);
}

@Test(expected = BadRequestException.class)
public void testCreateBadPersonNullName() {
    personSvc.createPerson(null, 5);
}
Try it out!
All of the code in this blog post is available on Github. Simply clone the repo and follow the steps in the README to run it locally.


